Impressum / DSGVO

Friday, August 30, 2013

FFwD: Floating Islands (Îles flottantes)


Today´s recipe for the French Fridays with Dorie group is the traditional and elegant French dessert called “Floating Islands" or "Îles Flottantes".


A classic French comfort food, floating islands (or îles flottantes) are meringues poached in custard or milk and topped with a caramel sauce. It is a popular French childhood dessert that often brings back sweet memories and is considered to be a real treat. Floating islands are also known as "oeufs à la neige" in French or "Schnee- Eier" in German (which in turn means "snow eggs").


This is a dreamy kind of dessert that requires a few different steps before it can be enjoyed. I started with the vanilla custard sauce that contains nothing but egg yolks, sugar, milk, some cream and the scraped seeds of a vanilla bean. Then I made the caramel sauce with sugar, water, butter and lemon juice. The third step was the meringue that following Dorie´s recipe contains six egg whites, a pinch of sea salt, sugar and more vanilla (I used vanilla bean seeds again).


Then you can either poach the meringues in milk with sugar or bake them in a water filled baking dish - I chose to fill the bottoms of eight oven-proof ramekins with the caramel sauce, filled the dishes to the rim with the meringue, placed the dishes in a water bath and baked them in the oven for a good twenty minutes. Of course, if you poach the meringues, they will look more like "oeufs à la neige" or "snow eggs" and if you bake them, they will look more like "îles" or "islands".


Some of my dreamy islands were served in a generous pool of that homemade vanilla custard sauce, some were served just as is with some added caramel sauce - they were gone before I had a chance to explain why I had been in the kitchen for so long preparing this very French dessert...

Well, at least now I have a bit of routine preparing these and it will hopefully not take me that long next time, good, because I am planning on making these again.

To take a look at some more floating islands, or snow eggs or baked meringues that were prepared by the other members of the French Fridays with Dorie group, please click here.


Thursday, August 29, 2013

"River Cottage Veg Everyday" - Marinated courgettes with mozzarella


It is the end of August and courgettes are rather cheap and abundantly available right now. They are tasty, quick-growing and endlessly versatile, in fact, recipes for courgettes come in as many shapes and sizes as the squash itself. Varieties of this summer vegetable can range in size from small and long shaped to humongous or even round shaped. The colors vary from dark green to pale green streaked with cream or even bright yellow.

Seeing that these courgettes were freshly picked the same day I bought them at my favorite farm stand, I chose the green, smallish long ones to star in my fifth recipe for my "River Cottage Veg Everyday" series, the delightfully fresh Mediterranean-style "Marinated courgettes with mozzarella".


The most "difficult" part about this recipe, is cutting the courgettes into thin strips or rather slices. You have to sear the slices in a hot pan (I used my beloved grill pan) and then prepare a marinade with extra virgin olive oil (which I always get at our local oil mill in town), garlic, lemon (zest and juice from an organic lemon), sea salt, freshly ground black pepper and basil.


The courgette slices should marinate for about an hour at room temperature and just before serving tear up or slice some buffalo mozzarella (regular will do as well) and strew the marinated courgettes with the fresh cheese.


I have been making a similar recipe for years now, it is one of my most favorite appetizers or anitipasti of all times - so, I do not really consider myself to be all that impartial - but trust me whe I say, this is just a perfect (late) summer appetizer - it is fresh and tangy and you could showcase your very favorite bread alongside and then mop up some of the fabulous marinade - that´s why you should really use a good-quality olive oil for the marinade, it will make quite a difference in how this dish tastes like.

If you own the English edition of this vegetable cookbook, you will find the recipe on page 314 in the chapter on "Mezze & Tapas".


Tuesday, August 27, 2013

Marguerite's Cake - Margaritenkuchen


Always on the lookout for special baking molds, I came across a vintage specialty baking pans called “Marguerite’s Cake Mold” (Magaritenkuchenform) a few weeks back. I really like these molds that are in the shape of the beautiful summer flower with the same name.
Immer auf der Suche nach einer besonderen Backform, fand ich vor einiger Zeit eine sogenannte Margaritenkuchenform ("Marguerite's Cake Mold"). Ich mag diese Formen, die nach der hübschen Blume mit dem gleichen Namen benannt sind.


Although I already own one of the “newer models” of these baking pans, I could not resist the charm of this smaller and rather heavy “vintage version”, took it home with me and decided to bake a simple vanilla cake in this pretty baking pan. I chose this version of the "Marguerite's Cake" ("Margaritenkuchen") because these kinds of cakes release easily from baking pans such as this and I really wanted the detail of the pan to show clearly  in the finished cake.
Obwohl ich bereits eines der "neueren Modelle" dieser speziellen Backformen besitze, konnte ich dem Charme dieser kleineren und eher schweren "alten Version" nicht widerstehen, nahm sie mit nach Hause und beschloss, einen einfachen Vanillekuchen in dieser schönen Backform zu backen. Ich habe diese Version eines Margaritenkuchens ("Marguerite's Cake") ausgewählt, da sich so ein Kuchenteig wunderbar aus solchen Backformen lösen lässt und die Details der Kuchenform bei dem fertigen Kuchen gut zu erkennen sind.


Usually, the typical “Marguerite’s Cake” ("Margaritenkuchen") , is baked with some good quality marzipan in the cake batter and the final cake is decorated with marzipan flower leaves, that way the cake bears a striking resemblance to the marguerite flower – if you would like to see how that looks like, you can take a look at my Birthday Tribute to Julia Child – I baked her the traditional version of this cake.
In der Regel wird der traditionelle "Margaritenkuchen" ("Marguerite's Cake"), mit etwas Marzipan im Kuchenteig gebacken und der fertige Kuchen wird dann mit Marzipan Blütenblättern verziert, so hat der Kuchen eine auffallende Ähnlichkeit mit der echten Margerite – um zu sehen wie so das aussieht, kann man einen Blick auf mein Geburtstag-Tribut an Julia Child werfen – ich habe dafür die ebenfalls sehr leckere, traditionellere Version dieses Kuchens gebacken.


Marguerite’s Cake

Ingredients for the Cake
  • 200 grams unsalted butter, room temperature
  • 200 grams superfine (caster) sugar
  • 1 1/2 tsp pure vanilla sugar or 1/2 teaspoon pure vanilla extract
  • zest of 1/2 lemon (organic, please)
  • 4 eggs (M), organic or free range
  • 200 grams wheat flour
  • 1 tsp baking powder
  • a pinch of fine sea salt
  • some powdered sugar 
Margaritenkuchen

Zutaten für den Kuchen
  • 200 Gramm ungesalzene Butter, zimmerwarm
  • 200 Gramm feinster Zucker
  • 1 ½ TL Bourbon Vanille Zucker oder ½ TL natürliches Vanillearoma
  • Abrieb einer ½ Zitrone (Bio)
  • 4 Eier (M), Bio- oder Freilandhaltung
  • 200 Gramm Weizenmehl
  • 1 TL Backpulver
  • eine Prise feines Meersalz
  • etwas Puderzucker 


Preparation of the Cake
  1. Preheat the oven to 160°C (320°F).
  2. Prepare your specialty Marguerite's Cake Mold or any other mold and either butter and flour the specialty mold, or line the base of a 20 cm diameter (8 inch) cake pan with parchment paper and butter the sides of the pan.
  3. In the bowl of your mixer, cream the butter until soft, then add the sugar, the vanilla sugar (or vanilla extract) and the grated lemon zest and beat until light and fluffy.
  4. Add the eggs, one at a time, beating well after each addition.
  5. In another bowl, whisk together the flour, baking powder and salt.
  6. Add the flour to the butter mixture and mix until just combined.
  7. Transfer the batter to the prepared cake mold.
  8. Bake for around 45 minutes until an inserted skewer comes out clean. If the top is darkening too quickly, cover loosely with aluminium (tin) foil.
  9. Remove the cake from the oven, and leave to stand for 15 minutes on a rooling rack.
  10. Then turn the cake out of the baking pan and onto the cooling rack and let cool completely.
  11. If desired, dust lightly with icing sugar just before serving.
Zubereitung des Kuchens
  1. Den Ofen auf 160 Grad vorheizen.
  2. Die Margaritenform vorbereiten. Falls sie keine Margaritenform besitzen, können sie auch eine andere Backform wie zum Beispiel eine kleine Springform (20 Zentimeter) benutzen, dann die Form entweder mit Butter ausstreichen und mit Mehl ausstäuben oder mit Backpapier auskleiden.
  3. Zimmerwarme Butter und Zucker mit dem Handrührer oder in der Küchenmaschine zu einer dicken Creme schlagen, dann Vanillezucker und Zitroneneschale hinzufügen und ebenfalls unterrühren.
  4. Dann die Eier hinzufügen und jeweils gut unterrühren.
  5. In einer Schüssel das Mehl, Backpulver und Salz mischen.
  6. Die Mehlmischung zu der Buttermischung geben und kurz weiter rühren.
  7. Den Teig in die Form füllen.
  8. Zirka 45 Minuten backen – falls der Kuchen zu schnell dunkel wird, den Kuchen während des Backens locker mit Alufolie abdecken.
  9. Den Kuchen aus dem Ofen nehmen und auf einem Kuchengitter für 15 Minuten erkalten lassen.
  10. Dann aus der Backform stürzen und auf einem Kuchengitter ganz erkalten lassen.
  11. Falls gewünscht, mit Puderzucker bestreuen und servieren.


Much as I like the traditional version of this pretty cake, this lovely vanilla scented "Marguerite’s Cake" ("Margaritenkuchen") is equally delicious and I think it shows off perfectly this wonderful vintage cake mold. It is a perfect little tea or coffee cake!
So sehr ich die traditionelle Version dieses schönen "Margaritenkuchens" ("Marguerite’s Cake") auch mag, so sehr gefällt mir auch diese nach Vanille duftende Version. Ich denke, dass dieser Kuchen die Form richtig schön zur Geltung bringt. Ein schöner Kuchen zum Nachmittagstee oder Kaffee.


Monday, August 26, 2013

"River Cottage Veg Everyday" - Lemony guacamole


As the fourth recipe in my "River Cottage Veg Everyday" series, I chose the delightfully fresh and slightly spicy "Lemony guacamole".

Hugh Fearnley-Whittingstall comments his recipe with the words "A good guacamole is creamy and comforting, and peppy and invigorating at the same time". And this recipe certainly delivers on that premise.


Guacamole is a Mexican dish of mashed avocado mixed with lemon or lime juice and various seasonings. Sometimes finely chopped tomatoes and onions are also added.


The ingredients for this Lemony guacamole are small chilies, chopped coriander, freshly squeezed lemon and/or lime juice, ripe and creamy avocados,  rapeseed oil, fine sea salt, freshly ground black pepper and some optinal yoghurt (I used 10% Greek yoghurt). Easy to find fresh ingredients, the remainder are pantry items. Perfect for a weekday evening. Got lucky and found two perfectly ripe avocados sans blemishes for this recipe.

I decided to make some homemade pita chips with fresh chives for dipping and served freshly cut limes on the side.This was a very well-received nibble/appetizer and while the kids support some spiciness in their food, I made sure not to overdo it - we all agreed that this is a fabulous recipe - loved it!


This wonderful Lemony guacamole can be used as a dip, sauce, topping or side dish. Guacamole is equally delicious as a topping for burgers and as a dip for oven-roasted potatoes and freshly cut vegetables such as carrots and celery sticks. It is also usually served as an accompaniment to fajitas, along with sour cream.

You can make it chunky or smooth, according to taste. Whichever way you serve it, if you do make it in advance, do remember to sprinkle the guacamole with lemon or lime juice and cover well with plastic wrap because avocados turn brown quite quickly once they are exposed to air.

If you own the English edition of this vegetable cookbook, you will find the recipe on page 296 in the chapter on "Mezze & Tapas".


Friday, August 23, 2013

FFwD: Boulevard Raspail Corn on the Cob


Today´s recipe for the French Fridays with Dorie group is “Boulevard Raspail Corn on the Cob”.


Boulevard Raspail is a boulevard in Paris, France, it was named after François-Vincent Raspail (1794–1878), a French chemist, doctor and politician. Dorie apparently frequents the Sunday organic market there when she spends time in her apartment in Paris and during one of her shopping trips came across this recipe for cooking corn on the cob which calls for baking the ears of corn  for about forty minutes in the oven (turn once after twenty minutes) in order to achieve really delicious tasting corn.

Dorie notes in her recipe that “you do not see much corn on the cob in France” – well, the same holds true for Germany, while you can find two ears of corn that have already been chucked and wrapped or even sealed in plastic (mostly already pre-cooked), it is almost impossible to find corn in the husk around here. So the question quickly turned to "how do I solve this predicament" - after begging a farmer, I was proudly carrying a basket with about eight ears of corn home and could get started with this recipe. I certainly did not want to miss another one of the recipes, especially not this one.


While I placed six of my loot of eight on the grill, I prepared the remaining two ears of corn the way Dorie instructs – oven, twenty minutes, turn, another twenty minutes. Done. We liked both versions.

Dorie also mentions that there is more than one way to serve corn and so I decided to have a bit of fun with the baked kernels, cut them off the husk and prepared some summery appetizers for our guests. Love those tiny Weck jars. They are perfect for entertaining.


Appetizer with Boulevard Raspail Corn on the Cob

Ingredients for the Appetizer
  • 2 ears of corn in the husk
  • a few almonds (skins off) - I used the lovely Spanish Marcona almonds
  • some butter
  • two tbsp of local honey (organic if possible)
  • coarse sea salt (to taste)
  • freshly ground black pepper (to taste)
  • a few tbsp of Greek Yoghurt (I used about 250 grams)
  • fresh dill

Preparation of the Appetizer
  1. Pre-heat the oven to 200 degrees Celsius
  2. Place the unhusked ears of corn on the oven rack, roast for 20 minutes, turn, roast for another 20 minutes.
  3. Shuck the corn, let cool. Then cut the kernels off the cobs.
  4. While the corn is in the oven, heat a cast iron pan, melt the butter, add the honey and the sea salt and stir with a wooden spoon until everything has melted.
  5. Add the almonds and boil gently – do not stop stirring and do be careful - this is hot!
  6. After a few minutes, the almonds will be nicely coated, carefully place them on a parchment lined baking sheet and let cool. Once cool, coarsely chop and keep some whole.
  7. Stir some pepper and salt into the Greek yoghurt (to taste) and drop a spoonful in each Weck glass.
  8. Layer with fresh dill, yoghurt, corn kernels, chopped almonds. Serve cool or at room temperature.


While I liked a new way to prepare corn, I am not quite sure that I want to turn on the oven for about 40 minutes in summer to prepare corn this way, but, again, I always love to learn something new and I took the liberty (again) to play around with this recipe a bit. Considering the fact that the appetizers were well-received and the time it took to find a few ears of corn in the husk, I do not think that Dorie would mind.

If you are interested in more Boulevard Raspail Corn on the Cob as it was prepared and interpreted by my fellow members of the French Fridays with Dorie group, please click here.


Thursday, August 22, 2013

"River Cottage Veg Everyday" - Oven-dried Tomatoes


Tomatoes are at their best right now and beautiful, locally grown tomatoes are abundantly available at area farmers´ markets, therefore, as the third recipe in my "River Cottage Veg Everyday" series, I chose the perfect late August recipe, namely "Oven-dried tomatoes".

Hugh Fearnley-Whittingstall comments his recipe by pointing out that "commercially 'sun-dried' tomatoes are often lip-pursingly intense, sharp and sometimes a little leathery. Home-dried ones are altogether different." And this recipe proves him right. And what I really like is the fact that this recipe is also an easy way to improve somewhat "indifferent" tomatoes by oven-drying them using this recipe.


All you need for these Oven-dried tomatoes is tomatoes, some sugar, a few sprigs of thyme and and some bay leaves (both these herbs grow in the garden), plus some good-quality olive oil and some fine sea salt and freshly ground black pepper. I could not help it and added some rosemary and a bit of garlic as well.

However you will need a few hours time for this recipe since the first step is "to cure" the halved tomatoes for about an hour with a sprinkling of salt and sugar, place them on a rack and wait for juices to drip. After that it is the oven-drying for 4 to 5 hours (if you are like me and prefer the tomatoes "semi-dried") or 7 to 8 hours (if you prefer your tomatoes to be more on the "dry side").


There is no end to the uses that you can put these tomatoes to such as adding them to pesto, frittatas, sandwiches, serving them as part of an antipasto or mezze platter, or even as nibbles with some fresh bread such as ciabatta or breadsticks such as grissinis or alongside some wonderful cheese.


This recipe is not a labor intensive process, but certainly a lengthy one. Once dried, store these tasty gems in the refrigerator with a generous coating of more olive oil.

If you own the English edition of this vegetable cookbook, you will find the recipe for these wonderful Oven-dried Tomatoes on page 304 in the chapter on "Mezze & Tapas".


Wednesday, August 21, 2013

Hugh Fearnley-Whittingstall´s "River Cottage Veg Everyday" - New potato salad "tartare"


As the second recipe in my "River Cottage Veg Everyday" series, I chose the delightfully summery "New potato salad "tartare".

Hugh Fearnley-Whittingstall describes this salad as "a simple, deconstructed version of good old tartare sauce" that is used "to dress freshly cooked, earthly little new potatoes".


When I took a look at this recipe, I knew that the kids would really enjoy this salad because homemade tartare sauce happens to be one of their favorite sauces of all times, plus they adore potatoes and hard-boiled eggs.

Since it is almost the end of August, I found the most wonderful local "new potatoes" which are the main ingrediensts of this salad. Plus I bought lots of fresh herbs and eggs from a farm nearby.

After boiling the new potatoes with skins on, the next step is the vinaigrette which consists of cider vinegar, Dijon mustard, olive oil, sea salt and freshly ground pepper - you have to dress the potatoes while still warm.


Then after the potatoes have cooled, you add some capers, gherkins, chopped dill, parsley and chives and do not forget to very gently fold in the quartered hard-boiled eggs. Done! You might want to add some more salt and pepper just before serving - potato salads always seem to need a bit more salt and pepper than other salads.


We enjoyed this "New potato salad tartare" with a few turkey sausages and as the salad disappeared before my eyes in no time, I realized that although my family really likes the German-style potato salads with a mayonnaise dressing, they also really enjoy the versions that have a vinaigrette dressing. There was no potato salad left at the end of the meal, none, although I did double the recipe.

What a wonderful recipe  - I really liked the fact that I got to use the small new potatoes that are so very flavorful at this time of year, they do indeed lend a certain earthiness to this salad that is wonderful in combination with the tangy dressing with capers and gherkins and tons of herbs. Delightful!

If you own the English edition of this vegetable cookbook, you will find the recipe on page 79.


Tuesday, August 20, 2013

Hugh Fearnley-Whittingstall´s " River Cottage Veg Everyday" - Leek and cheese toastie


Today I am starting a new project or rather series  - recipe by recipe, I am cooking and learning my way through a wonderful vegetable cookbook written in 2011 by Hugh Fearnley-Whittingstall.

Hugh Fearnley-Whittingstall is a welll-known British chef, TV personality, journalist, food writer and "real food" campaigner, known for his "back-to-basics philosophy". He is best known for hosting the River Cottage series, in which audiences observe his efforts to become a "self-reliant, downshifted farmer in rural England", his aim is to feed himself, his family and friends with locally produced and sourced fruits, vegetables, fish, eggs and meat.


For the first week of my somewhat ambitious project, I chose three recipes and I am starting today with "Leek and cheese toastie". I will try to prepare at least three recipes a week and post them either separately (like this week) or all together in one post - this will depend on the time available.

While I cook my way through this wonderful book, I will still post for the groups that I have participated in for over a year now and I will also still bake lots of European treats, just as I have been doing for the last year and a half now.

This series is meant to be an additional project aimed at cooking more vegetable dishes, learning new ways to prepare tasty and healthy dishes and share them with family and friends.


I will make an effort to use as much local, regional, organic and also seasonal produce as is resonably possible. However, for copyright reasons, I will not publish the recipes - maybe I can encourage you to buy this book and cook along with me - I certainly would not mind some friendly company!!!

When Hugh Fearnley-Whittingstall notes that this recipe for Leek and cheese toastie is "perhaps the simplest and most mid-week-friendly" of all his "leek-based cheesy toast toppings" - he is right.

The delicious and easy topping consists of but a few ingredients, namely some good quality butter, sliced fresh leeks and fragrant thyme - cook gently for about 10 to 15 minutes and then all that is left to do is to stir in some double cream, simmer some more, fold in some grated cheese such as Cheddar, add salt and freshly ground pepper to taste, then toast a few slices of sourdough bread (or other bread that you prefer), spread with the still warm topping and top with more cheese, then grill until golden - pure midweek deliciousness if you ask my family and me!


Thyme grows in my garden, fresh leeks can be easily found locally, the bread is from my favorite baker nearby and the cheese I used was Emmenthal. We were all more than pleased with this first vegetable recipe from the book and are looking forward to tomorrow´s recipe.

For those of you who own this book, the recipe can be found on page 202 of the English edition.

For this series, I will be using the British edition of "River Cottage Everyday Veg" by Hugh Fearnley-Whittingstall published by Bloomsbury Trade (September 19th, 2011). Thers is also an American edition called "River Cottage Veg: 200 Inspired Vegetable Recipes" May 14th, 2013), as well as a German edition called "Täglich vegetarisch - Die schönsten Rezepte aus dem River Cottage von Hugh Fearnley-Whittingstall" (January 30th, 2013).

Wednesday, August 14, 2013

Happy 101st Birthday, Julia!

On August, 15th of last year, I decided to celebrate Julia Child´s very special 100th Birthday by baking her a cake that I thought she might have liked, bringing it to the house where she used to live in from 1954 to 1956 while she spent two years in Germany with her husband Paul.

On the occasion of Julia Child´s 101st birthday tomorrow, I decided to re-blog this post, it is still very dear to my heart.


"Dear Julia,


before we start the celebration on your special day today, let me tell you that although we have never met in person or had our picture taken together and although I was never lucky enough to attend any of your cooking shows or book signings, our paths have crossed in more than one way, and one aspect stands out in particular.


For two years of your wonderful and interesting life, you used to live in the same City that I grew-up in and live in again today with my family!


While I was reading the fabulous book „As Always, Julia: The Letters of Julia Child and Avis DeVoto” (published December, 1, 2010), I came across the following excerpt from the book, it is one of your letters to your friend Avis, dated October 27, 1954:


In 1954, you and your husband Paul moved to what was then the capital of the Federal Republic of Germany, namely Bonn. You lived here for two years. In your letter, you talk about your time in Germany, your struggles with learning the German language and the apartment that you and Paul used to live in. You write that the apartment was located at “Steubenring 3, Apt. 5, Plittersdorfer Aue, Bad Godesberg, Germany”. It was located in an area of Bonn known then as the American sector, it was an apartment complex owned by the HICOG, the “High Commission for Occupied Germany”.

Well, let me tell you, I was quite delighed to see that the housing complex still exists and so does your former apartment.


1952


2012


I took my two youngest daughters to the housing complex, a mere 15 minute drive from our house. When you compare the photograph dated 1952 with the photograph I took today, you will hardly see any difference. Except, today, the people that live in these apartments work mostly for the United Nations. While, obviously, the names have changed on the name plates, the apartments still bear the same numbers - yours was number five, third floor, on the right.


After our little photo session in front of your former apartment, we decided to wander in your footsteps for a brief moment in time and it felt really special! Right around the corner from the apartment complex, there is now the so-called United Nations Campus, then there is the Bonn International School and, of course the Rhine River. In your letters, I read that you really enjoyed your walks along the riverbank. There also used to be an American supermarket and an American Club. And just a few steps away, there is the “Stimson Memorial Chapel”.


Built in 1952 and owned by the American Government until June, 20, 1999, when it was presented as a gift of the United States of America to the City of Bonn...


…by the President at the time, Bill Clinton.


Julia, looking at the house where you used to live at during your life in Germany for two years with your husband Paul, and walking through your former neighbourhood, I could not help but wonder about the places where you used to take your walks, did your groceries and how your kitchen used to look like, looking at the size of the apartment, I guess it was another “very small German kitchen”.


Oh, let me mention one more thing that we share. I was born in August too, just like you, born under the sign of the Leo – now, let´s celebrate and have a slice of the birthday cake that I baked for you, a marzipan cake, shaped like a flower and proudly displayed right in front of your former apartment by two young fans of yours, my two youngest daughters! And although I took the liberty of baking one of my recipes, I am sure that you approve, a German recipe to celebrate your birthday and remember the time that you spent in this country.


Happy 101st Birthday, Julia! - Herzlichen Glückwunsch zu deinem 101.Geburtstag, Julia!"


Monday, August 12, 2013

A Visit to Bruges (Belgium) - Part II (Speculoos)


This is part II of my Bruges mini-series and this post is all about that famous Speculoos in Flemish and Speculaas in Dutch, whichever way you pronounce it, these buttery, short crust cookies that are related to the gingerbread family of cookies, are replete with warming spices such as cinnamon, ginger and cloves. They continue to be a Flemish and Dutch favorite that has captured the fancy of cookie lovers all over the world.


While we visited Bruges a few days ago, we marveled not only at unbelievably delicious local foods and chocolates but we were also lucky enough to sample a variety of these iconic cookies that often come in the shape of picturesque windmills - when we returned home,  I tried to re-create these lovely cookies using some of the specialty wooden molds from my collection.


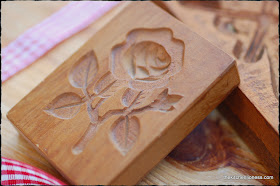
This mold depicts a lovely rose and was given to me a few years ago - it is from an antique store in Bavaria.


This one was made from a different type of wood and it depicts a bearded fellow...


... when you look closely you can see that the depth of the carvings differs from mold to mold. As a general rule, the more detail there is, the clearer the outlines of the final cookies will be - although it also depends on the kind of recipe that you use for your cookies and whether the dough was chilled properly.


If you are a fan of what is possibly Belgium´s favorite cookie and of all things cookie and speculoos-related, Bruges is the place to visit. Speculoos cookies are actually sold in the US by a famous Begian company as Biscoff cookies.


When you are in Bruges, speculoos cookies are sold at every bakery and some specialty baking shops also carry the traditional wooden baking molds to make these wonderful cookies at home.


One of the most famous bakeries where the speculoos cookies are sold is Juliette´s, a bakery run by cookie expert and shop owner Brenda Keirsebilck.


In her iconic, artisanal shop that emanates mouth-watering wafts of almond, sugar, spice and really everything nice, you can find many delicious and decadent treats such as the custom made speculoos - this one features the Belfry of Bruges, the medieval bell tower in the historical centre of Bruges, it is one of the city's most prominent symbols. But there are also birthday and graduation wish hearts, baked invitations and depending on the season, Saint Nicholas´or Easter bunnies.


Or these meringues with different flavors such as “Natuur” (plain) or…


…or “Cocos” (coconut) and “Pistache and Rozenwater” (pistachio and rosewater)…


…or “Mojito”…


…or "Koffie met Hazelnoot" (coffee and hazelnut) and "Nougat" (nougat)...


…or those lovely meringues that are pink-hued and  “Cuberdon-flavored”. Cuberdons are raspberry-flavored and purple, though more recently differently colored variants have been available as well. The outside is relatively hard, whereas the inside is gelatinous. Cuberdons can only be kept for about three weeks, after that the inside begins to crystallize. That is the reason why cuberdons are not exported outside of Belgium - they are considered to be a regional Belgian product.


Speculoos used to be Christmas-time only cookies, but in the last couple of years, there has been a real rebirth regarding these special cookies. Brenda Keirseblick is also the author of “Juliette’s Speculoos: Recipes from Bruges’ most charming biscuit bakery”.


You can sample not only those lovely and delicate meringues but also cupcakes with various toppings, giant cookies and squares of speculoos with delicious, marzipan-filled centers, some dipped in chocolate, others flecked with toasted almond slivers, the combinations are absolutely delightful. I really liked these "Hasseltse zachte Speculoos" - soft speculoos that take their name from "Hasselt", a Belgian city and capital of the Flemish province of Limburg.


There is even an on-site made speculoos spread (also known as "speculoos or biscoof pasta or spread") that is delicious on hot buttered toast or wonderful for baking cookies, cupcakes or cakes.


And last but not least, you can also buy the most tender of "Nougat" (nougat) at Juliette`s.


In order to re-create a bit of the charm of this lovely artisinal bakery at home, I tried out a few recipes for Speculoos, with and without almonds, with more or less generous amounts of spices and finally settled on this spicy version - the smell that eminates from the kitchen while these are baking is nothing short of wonderful - even in August warm spices have a certain magic to them.


Speculoos Cookies

Ingredients for the cookies
  • 250 grams white spelt flour (you can substitute wheat flour/AP flour instead)
  • 2 tsp freshly ground ginger
  • ¾ tsp freshly ground cloves
  • 1 tsp freshly ground cinnamon
  • 1/2 tsp freshly ground nutmeg
  • ½  tsp fine sea salt
  • ½ tsp baking soda
  • 110 grams unsalted butter
  • 85 grams soft brown sugar (you can use soft light or dark brown sugar)
  • 2 tsps pure vanilla sugar
  • 1 egg (S), organic or free range whenever possible
  • 60 ml clear honey 
  • 1 tbsp molasses


Preparation of the Cookies
  1. In a large bowl, sift together the flour, spices, salt and baking soda.
  2. In a separate bowl, beat the butter until creamy. Add the sugar and vanilla sugar and continue to beat until soft and fluffy.
  3. Add the egg and mix well.
  4. Then add the honey and molasses.
  5. Add the flour mixture to the butter and mix until you have a smooth dough - it will be soft.
  6. Wrap the dough in saran wrap and refrigerate overnight.
  7. The following day, preheat the oven to 175 degrees Celsius and line two baking sheets with parchment paper.
  8. Take slices of the chilled dough and place on a lightly floured surface.
  9. Roll out to around 1 1/2cm thick, then dust the top lightly with flour and press the molds into the dough - or use cookie cutters to cut out your favorite shapes.
  10. Transfer the cookies to the prepared baking sheets.
  11. Bake the cookies for about 10 to 12 minutes or until they are just golden at the edges (you may need more or less time depending on the size of your cookies).
  12. When baked, allow the speculoos to cool for a minute or so and  then transfer to a wire rack to cool completely.


This is just one recipe for Speculoos - there are countless other ones, dark ones, lemon ones, vanilla ones, with or without almonds, the possibilities and the recipes seem to be endless but no matter which recipe you try, now or later during the year, Speculoos cookies are always delicious and pretty and worth the bit of extra work.


Let me be honest, it does take a bit of practice to work with these specialty molds and it is a tad time consuming...


...but definitely worth it (once in a while) and no matter which recipe you try, you should always make sure to use the freshest of spices you can. And as I already mentioned above, if you cannot find or own these specialty wooden cookie molds, you can also use cookie cutters or even a cookie press - speculoos cookies will always taste heavenly no matter what shape they are!