Impressum / DSGVO

Thursday, December 27, 2018

As 2018 draws to a close: Buckwheat Salad with Burrata, Eggplant, Zucchini & Baby Spinach


As this year draws to a close, we long for a winter salad, with grains or seeds, heavy with veggies and topped with fresh, creamy cheese. To change things up a bit, I chose to use buckwheat rather than my other favorites for this type of salad, such as barley, farro or freekeh (for a base recipe, please take a look here).


The name 'Buckwheat' is somewhat deceiving as buckwheat is not a grain and has no relation to wheat at all. It is actually a seed, and the plant is a relative of rhubarb. However, it is very similar to a grain, so people tend to include it in that category. Buckwheat is often used in a similar way to rice, barley, bulgar or quinoa, usually as a side dish. You can also use buckwheat for a breakfast porridge with milk, or ground into flour for blini pancakes, bread and noodles. If you are a bit hesitant about the taste of buckwheat, you might enjoy Japanese Soba Noodles, although made from buckwheat flour, they are more delicate and less nutty than buckwheat groats and make delicious salads too.

Buckwheat kernels have a dark hull with a lighter inner seed. And groats are the intact seeds with the hull removed, used for cooking. When toasted, the buckwheat groats are called Kasha, which is how they are most often used in Eastern Europe cooking.

However you chose to serve buckwheat, it has an intense, earthy, slightly nutty and smoky flavor.  Look for kasha, or plain groats, in Eastern European markets, health food shops or in the organic aisle at the grocery store, or simply order online. Once you shop for buckwheat and use it, please do remember that buckwheat contains about double the oil of most cereals, which affects its shelf life, so once opened, keep it in an airtight container.

I am using the hulled seed, or toasted buckwheat groats, in this salad. They cook quickly, unlike many other grains, and their nutty flavor is a delicious backdrop for the vegetables and cheese in this salad. The cooked groats are very light and fluffy in comparison to the denseness of many other grains. I love their texture, especially in salads. If you do enjoy buckwheat, feel free to substitute buckwheat for white rice in any dish.


Buckwheat Salad with Burrata, Eggplant, Zucchini & Baby Spinach

Ingredients

For the Salad
  • 250g toasted buckwheat groats (also called Kasha)
  • 2 zucchini (M), diced
  • 2 eggplants (M), diced
  • olive oil (some olive oil for frying the veg and some extra virgin olive oil for the salad dressing)
  • 100g baby spinach leaves, picked over, washed and dried (best done in a salad spinner)
  • one bunch of basil, leaves only, roughly torn (optional)

For the Dressing
  • 3 tbsp extra virgin olive oil (see above) or more
  • one lemon, juiced
  • one clove garlic, peeled and crushed (optional)
  • freshly ground black pepper, salt (to taste)

To serve
  • 200g ball burrata, drained and served whole – for looks – or torn into chunks (OR 2 x 125g balls mozzarella. also drained)

Preparation
  1. Bring a medium pot of water to a boil, turn the heat to very low, stir in the buckwheat, cover and cook about 10 to 15 minutes (depending on the type of buckwheat you are using, the cooking time might be up to 20 minutes). Set aside for a few minutes with the lid on, then spread on a plate, fluff with a fork and leave to cool.
  2. Meanwhile, fry eggplant (aubergine), zucchini (courgette), drain on paper towels and set aside to cool.
  3. Once cool, mix them in a large bowl with the buckwheat.
  4. For the dressing, in a small bowl, lightly whisk together olive oil, lemon juice, salt, and pepper (and garlic, if using). Set aside for a few minutes and then drain the garlic from the dressing. 
  5. Pour some of the dressing on the cooled buckwheat with the veg and toss gently to combine.
  6. Just before serving, stir in the spinach leaves.
  7. Arrange the buratta OR mozzarella, whole or torn into chunks, on top of OR around the salad and scatter the basil leaves over (optional). Scatter a little salt and pepper on top. 
  8. Quickly whisk up the remaining dressing again if necessary, drizzle it over and serve.

Recipe Note: If the buckwheat you plan to use for this recipe is not toasted, you can dry-roast it over medium heat for about 5 minutes or until it is golden brown in color then remove from heat and proceed with the recipe.


Just a quick note on that lovely Burrata - Burrata is a very decadent cheese – made from mozzarella and cream wrapped in more mozzarella. It is a wonderful addition here but if you cannot get hold of this lovely Italian cheese, feel free to use fresh Mozarella instead. Prosciutto di Parma (Parma ham) would also be a nice addition here as the enjoyable saltiness of that Italian ham goes so well with the soft and creamy Burrata and the delightfully nutty Buckwheat.


Sunday, December 23, 2018

Merry and Sweet Christmas Wishes


Wishing all of you and your families a very Merry Christmas & Happy Holidays!

Ich wünsche euch allen ein frohes Weihnachtfest und besinnliche Festtage!


Tuesday, December 18, 2018

December Lunch - Pizza Bianca with Fingerling Potatoes, Rosemary & Winter Purslane


Pizza Bianca, which translates to 'White Pizza' in Italian, is basically a pizza prepared without tomato sauce. My favorite version has a topping of thinly sliced new potatoes and gets its flavor from two kinds of cheese, one mild (mozzarella) one deliciously salty (parmesan), then delightfully woodsy rosemary from my garden and a lovely topping of peppery winter purslane. If you cannot find fresh Winter Purslane, of course, you could substitute with fresh arugula (aka rocket) here or other seasonal winter greens that you like.

As far as the pizza base is concerned, we all know that nothing beats making your own pizza dough but, particularly at this rather busy time of the year, there is no shame in using a good quality store bought pizza dough. Whether you make the dough yourself or not, just remember to make sure that your oven is rather hot as you are looking for a crust that will be crisp on the outside and chewy in the middle, maybe charred in spots, giving your Pizza Bianca that slightly smoky flavor that you love from brick ovens.


Pizza Bianca with Potatoes , Rosemary & Purslane

Ingredients for the Toppings
  • 1 pizza base* (use your favorite recipe OR use a good quality store bought one)
  • 4 to 5 fingerling potatoes, cooked, cooled, skins on or off, slice as thinly as possible (although a mandoline works best here, you could use a sharp knife)
  • good olive oil (about 2 tbsps)
  • freshly ground black pepper and salt
  • 50g mozzarella cheese, coarsely grated (if you grate the mozzarella yourself and it is rather soft, freeze briefly before grating, making your life a lot easier when you make this recipe)
  • some parmesan cheese, finely grated
  • small rosemary twigs OR use thyme 

          Winter Greens Topping (optional)
          • fresh purslane, washed, picked through and dried (OR use other winter greens)
          • some good olive oil
          • freshly ground black pepper and salt, to taste

          Preparation
          1. Preheat your oven to 240° C (464°F) or as hot as it will go.
          2. Transfer the dough directly onto an upside-down oiled baking sheet OR use a pizza stone.
          3. Flatten the dough into rough pizza shape.
          4. Prove the dough for a good 5 minutes while you prepare the toppings.
          5. Pat away any excess moisture from the potatoes and carefully toss the potato slices in the olive oil and season with pepper and salt to taste.
          6. Top base with the mozzarella and parmesan. 
          7. Lay the potato slices on top and drizzle with any remaining olive oil from the bowl. 
          8. Top with rosemary.
          9. Bake for 15 to 20 minutes OR until the base is puffed and golden and the potatoes are crisping up around the edges. Set aside for a moment while you prepare the winter green topping.
          10. Top with purslane or other greens, as is, or tossed with a bit of olive oil, freshly ground black pepper and salt.
          11. Serve warm or at room temperature.

          Ingredients for the Pizza Dough*

          For the biga
          • 150g flour, plus extra for dusting (please note: for pizza making it is best to use (strong) white bread flour or Tipo '00' flour available at most Italian supermarkets or online)
          • ½ tsp fast-action dried yeast
          • ½ tsp fine (caster) sugar
          • 150ml lukewarm water 
          For the final dough
          • 275g flour
          • 1 tsp fast-action dried yeast
          • 2 tbsp olive oil
          • 1 tsp salt 
          • about 200 to 220ml lukewarm water

          Preparation of the Pizza Dough

          1. Make the biga the night before: mix the flour, yeast and sugar in a bowl. Slowly add 150ml lukewarm water and stir to create a thick batter. 
          2. Cover with plastic wrap or tea towel and leave in a warm place overnight to ferment.
          3. The next day: add the flour, yeast, olive oil and 1 tsp salt to the biga, then gradually mix in enough water to make a soft, wet dough that still holds its shape. 
          4. Cover and leave to rise for 2 to 4 hours or until tripled in size.
          5. Once the dough has risen, punch the dough to knock the air out, then tip out onto a heavily floured surface. Knead in the flour until the dough stops sticking to your hands – it should be very soft and springy, but not so wet that it sticks to the surface. 
          6. Divide the dough into two balls. Roll one out to make a large pizza base OR divide in half again to make two smaller pizzas (NOTE: double the toppings to make two pizza bianca or freeze one portion).


          Enjoy for lunch or dinner, just as is or maybe with a warming bowl of soup alongside.


          Sunday, September 2, 2018

          Chocoladetaart - Belgian Chocolate Tart


          If you follow my blog, you probably couldn't help but notice that I love to travel to Belgium. I am always game for a visit to the International Market in the city of Antwerp on a Saturday morning, following the so-called "Cookie Trail", tasting different coffees from local coffee roasters, shopping for "props", discovering foods and ingredients that can be hard to find around here. And, of course, there are those delicious Belgian waffles and chocolate, oh, that chocolate. I admit it's my favorite kind of chocolate. Not too sweet, intensively flavored, high quality ingredients. So when I came across a Belgian Chocoladetaart during our recent visit to the amazing city of Gent, I knew I had to work on a recipe to re-create this treat.

          Made with dark, decadent Belgian chocolate, this easy to make and rich Belgian Chocolate Tart tastes just the way I like it. Now, you can eat this an hour after you made it, it will still be a bit soft, crumbly and warm - and then if you place a generous dollop of sweet, whipped cream or crème fraîche on your slice, it will melt into one gooey, delectable dessert. But if you are inclined to make this ahead of time - it will be easier to slice, the taste will have mellowed and it will be just as delicious, with or without further adornments.

          So, without further ado, here is my must-try, Belgian bakery-inspired version of Chocoladetaart. If you do get a chance to make this one, do let me know whether you liked it as much as I do. By the way, the tarts that I came across in Gent, were always displayed with the baking paper, so I present it that way as well. Authenticity and all. And it makes me happy. It is also nice if you can bake this in a nice, colorful pie dish. One final remark, it is worth trying to source Belgian chocolate if at all possible, or use the best quality baking chocolate you can.


          Chocoladetaart - Belgian Chocolate Tart

          Ingredients
          • 200g unsalted butter, plus extra for greasing
          • 250g dark Belgian baking chocolate, broken up (OR use high qualty dark baking chocolate)
          • 8g pure vanilla sugar OR 1 tsp Madagascan vanilla extract
          • 4 eggs (M), free range or organic, separated
          • a pinch of fine sea salt
          • 100g icing sugar, sifted
          • 30g AP (plain) flour, sifted
          • 1 tbsp icing sugar, for dusting

          Preparation
          1. Preheat the oven to 180°C (356°F).
          2. Grease a 25cm round pie dish. Line the pie dish with baking parchment.
          3. Melt the chocolate and butter together over a pan of simmering water on the stove, taking care not to let any water come into contact with the chocolate butter mixture (bain marie).
          4. Stir in the vanilla sugar OR extract and let cool.
          5. In a medium bowl whisk the egg whites with the salt until soft peaks form. Set aside.
          6. In another bowl beat the egg yolks with the icing sugar until pale in color, then fold the chocolate mixture into the egg yolk mixture.
          7. Then fold the flour into the chocolate mixture.
          8. Fold one-third of the egg whites into the chocolate mixture, then gently fold in the rest until just blended.
          9. Spoon into the prepared pie dish, spreading evenly, and bake for 30 to 35 minutes - the cake will be still slightly wobbly/creamy in the middle.
          10. Let the cake cool on a rack before dusting with icing sugar.

          NOTE: Turn this into a decadent dessert by serving with softly whipped cream or crème fraîche sweetened with icing sugar. And serve some fresh seasonal fruits or berries alongside.


          Sometimes the best desserts are simple, and made with best quality ingredients, this indulgent Chocoladetaart - Belgian Chocolate Tart won't dash your expectations. - Bon appétit! 


          Saturday, August 25, 2018

          Impressions from my Visit to the 'Gourmet Festival' in the City of Düsseldorf, Germany


          Following are a few impressions from my Visit to the 'Gourmet Festival' in the City of Düsseldorf, Germany. Düsseldorf, often Dusseldorf in English sources, is the capital and, after 'Köln' (Cologne), second most populous city of the most populous German federal state of North Rhine-Westphalia, as well as the seventh most populous city in Germany.

          The Düsseldorf Gormet Festival is described as "Europe’s biggest open air event for high-quality and sought after food, non-food and drinks". It takes place along the 'Königsallee', literally 'King's Avenue', an urban boulevard noted for both the landscaped canal that runs along its center, as well as for the fashion showrooms and luxury retail stores located along its sides. Lovingly nicknamed '' by the locals, the Königsallee is by far Germany's busiest, upscale shopping street.

          It was certainly fun to taste and drink our happy way through a number of interesting and delicious foods, sweets, punch and ice creams. I especially liked the colorful food trucks and fun t-shirt wearing vendors and salespersons - very inspiring!


          Hope you enjoyed my virtual visit - for more information about the food festival along the 'Königsallee', pls go here.

          Tuesday, August 7, 2018

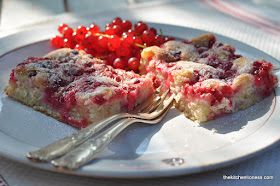
          August Baking - Red Currant Summer Cake


          This sweet, light and airy sponge cake recipe has a seasonal topping of juicy, tart red currants and is finished with just a dusting of icing sugar. Serve as is, with crème fraîche or lightly whipped cream and some extra red currants for a delightful summer dessert. August baking at its best.


          Red Currant Summer Cake

          Ingredients

          For the Batter
          • 113g (1 stick) unsalted butter, at room temperature, plus more to grease pan
          • 300g fresh red currants (with extra stalks for decoration)
          • 160g (1¼ cups) AP (plain) flour
          • 1 ½ tsp baking powder
          • ½ tsp fine sea salt
          • 100g (½ cup) superfine (caster) sugar
          • 1 tbsp Cognac or Brandy (you can substitute apple juice)
          • 4g (½ tsp) pure vanilla sugar
          • 1 egg (L), free range or organic
          • 120 ml (½ cup) milk, room temperature (I use 3.5 % or full fat milk)

          For the Topping
          • 2 tbsp sugar, for sprinkling (you can either use coarse or fine sugar – if you choose coarse, you will get a crunchy top)
          • 4g (½ tsp) pure vanilla sugar

          Preparation
          1. Preheat the oven to 180°C (356°F) degrees.
          2. Grease a 23cmx33cm (9x13in) baking pan and line with baking parchment.
          3. To prepare the red currants, hold each stalk over a bowl, grip the stalk at one end and sweep a fork down its length, making sure that the stalk runs between the fork's tines - all the berries should pop off. Set aside for a moment.
          4. In a separate bowl, whisk together the flour with the baking powder and salt.
          5. In the bowl of an electric mixer, beat together the butter, sugar, Cognac or Brandy and vanilla sugar until light and fluffy.
          6. Add the egg and beat until thoroughly combined.
          7. Add half the flour mixture and beat until just combined. Pour in the milk and continue beating, scraping down the bowl as necessary. Add the remaining flour mixture and beat until just combined.
          8. Scrape the dough into the pan, smoothing the top with a spatula.
          9. Scatter the red currants on top of the batter, in an even layer.
          10. In a small bowl, combine the sugar and vanilla sugar.
          11. Sprinkle the sugar mixture on top of the red currants.
          12. Bake for 35 to 40 minutes or until the top is light golden brown.
          13. Transfer the cake to a wire rack to cool completely
          14. Unmold, transfer to serving platter, dust with icing sugar just before serving. Enjoy with crème fraîche or lightly whipped cream if you like.


          Enjoy August seasonal baking with summer berries including red currants, raspberries and blackberries, when they are at their peak and bursting with sweet and tart flavor, it's definitely worth it!


          Wednesday, August 1, 2018

          Ricotta Tart with Baby Spinach & Garden Herbs


          For the first day of August, just a quick post with an easy summer recipe for a colorful and delicous Ricotta Tart with Baby Spinach & Herbs. For this easy summertime recipe, you can either chose to make your own Shortcrust Pastry (for ease of reference I included a recipe in his post) or use a good quality store-bought one. You can either use homemade Ricotta (which is what I like to use) or use a quality Italian brand instead. It is summertime after all and the weather is hot. Spending a long time in the kitchen these days, is not always desirable. The tart will taste wonderful whichever option you chose.


          Ricotta Tart with Baby Spinach & Garden Herbs

          Ingredients for the Shortcrust Pastry
          • 250g plain (AP) flour
          • ½ tsp fine sea salt
          • 150g cold unsalted butter
          • 1 egg yolk (M), free range or organic
          • 2 tbsps cider vinegar

          Ingredients for the Filling
          • 2 tbsps or more olive oil
          • 200g (7 ounces) red spring onions, washed, dried and sliced thinly - you can also use regular red onions, scallions, leeks, or ramps (in springtime) in their place
          • 1 fat garlic clove, finely minced (you can forgo the garlic if you prefer)
          • sea salt and freshly ground black pepper (you can also add a few Italian Peperoncini flakes here)
          • 4 eggs (M), free range or organic
          • a small bunch baby spinach, washed and dried (you can leave the small stems attached)
          • chives and Italian (flat-leaf) parsley, washed, dried and chopped OR use other seasonal, soft garden herbs
          • 500g (17.5 ounces) fresh ricotta (either homemade or store-bought)

          Preparation of the Crust
          1. For the pastry, put the flour, salt, butter, egg yolk and vinegar into a food processor. Using the pulse button, process until the mix binds. Alternatively mix by hand or with a pastry cutter.
          2. Gather all the ingredients into a smooth ball. Wrap with food wrap. Place in the fridge for about 30 minutes.
          3. Uwrap the cold pastry and place onto a lightly floured work surface, then roll out as evenly as you can. 
          4. Line the base of a 23cm x 2.5cm (9in x 1in) loose-bottomed, fluted tart/quiche pan with baking parchment. Alternatively, you can use a springform pan here.
          5. Ease the rolled out pastry into the prepared tart pan, press the pastry into the flutes, trim the pastry edges, making sure to save the trimmings. The pastry should be slightly above the rim of the tart pan. Lightly prick the base with a fork, then chill again, this time for about 15 minutes or until the pastry case is cold and firm again.
          6. Put a baking sheet in the oven and heat oven to 200° C ( 395°F).
          7. Line the pastry case with crumpled-up baking parchment, fill with dry beans and bake on the hot sheet for 15 minutes - I like to place another sheet of baking parchment under the tart pan.
          8. Remove the parchment and beans and bake for about 5 minutes more until the pastry is pale golden. If you notice any small holes or cracks, now is the time to patch up with pastry trimmings. NOTE: You can prepare the pastry case up to this point a day ahead.
          9. Place the pre-baked pastry shell on a cooling rack while preparing the filling.

          Preparation of the Filling
          1. In a medium skillet heat the olive oil over medium heat, add the sliced onions and garlic (if using), season with a bit of salt and pepper, cook until tender and cooked through. Remove the skillet from the heat, stir in the fresh baby spinach leaves, stir and let cool to room temperature. NOTE: the spinach leaves will wilt with the residual heat from the onion mixture.
          2. Preheat the oven to 200° C (400°F).
          3. Separate 2 of the eggs, keep the egg yolks separate, whisk the egg whites with a pinch of sea salt until soft peaks form. Set aside for a moment.
          4. In a large bowl, whisk the ricotta until reasonably smooth, then mix in the 2 egg yolks that you kept separate and the 2 whole eggs, add a bit more salt and pepper (and peperoncini if using) along with the onion/garlic/baby spinach mixture.
          5. Fold the chopped, fresh herbs into the ricotta mixture.
          6. Scrape the filling into the pre-baked tart shell and bake until just set and slightly-browned on top, 25 to 30 minutes or until it just feels set in the center.
          7. Let the tart cool briefly, then serve either warm or at room temperature. 
          8. Scatter fresh basil leaves and edible flowers (if using) over the top of the tart before serving - it is nice to serve a fresh tomato salad alongside.


          Enjoy this delectable Tart either warm, fresh out of the oven or serve at room temperature. It also keeps well for a day or two - if you have any leftovers, maybe bring a slice to a summertime alfresco lunch or dinner....