Thursday, May 28, 2015

The Cottage Cooking Club - May Recipes


The month of May marks the thirteenth month of our international online cooking group, The Cottage Cooking Club. As a group, recipe by recipe, we are cooking and learning our way through a wonderful vegetable cookbook written in 2011 by Hugh Fearnley-Whittingstall, called „River Cottage Everyday Veg“.


The Cottage Cooking Club is meant to be a project aimed at incorporating more vegetable dishes into our everyday cooking, learning about less known, forgotten or heritage vegetables, trying out  new ways to prepare tasty and healthy dishes, and sharing them with family and friends.

All the members of this cooking group will make an effort to use as much local, regional, organic and also seasonal produce as is resonably possible.

Since I prepared all ten recipes this month, I will write about each dish according to the order in which I prepared them. My first recipe for this May post is the Pearl barley broth (page 160), from the chapter "Hefty Soups“.


The base of this soup is a vegetable stock (page 130), a recipe in this book that I keep coming back to on a regular basis. The finely diced vegetables in this pearl barley broth include onions, celery, carrots, and parsnip. The spices used are ground coriander, nutmeg, cayenne pepper and mace. Then as herbs some fresh thyme and a bay leaf from the garden and, of course, medium sized pearl barley. Around here, the stores carry pearl barley in three different grades, the medium one being my favorite to use in substantial soups like this one. There was lots of flavor from the spices, the veg and the soup base. Just remember that the pearly barley will absorb quite a bit of liquid and you will end up with a rather thick soup if you prepare it in advance.

Add some wonderful crunchy, homemade croutons and a bit of sour cream and you end up with our kind of comfort-style, feel-good kind of soup. When frying the bread cubes for the croutons, I always add  a clove of crushed garlic to the olive oil - that way, they get a hint of garlic taste to them which we really enjoy.


The second recipe that I prepared is the Kohlrabi carpaccio (page 116) from the chapter „Raw Assemblies“. Before getting started on this recipe make sure to go for small sized kohlrabi (or as hugh points out, "not bigger than an apple") – I used to be a real kohlrabi addict as a child and I still know that when it comes to this lovely veg, the smaller it is, the sweeter it is and the less fibrous it is likely going to be. Always buy the freshest produce you can when putting together these raw assembllies recipes – you do need the crunchiness of the vegetable to stand up to the bold dressings.


Slice as thinly as possible, make a dressing with lemon juice, mild olive oil, sea salt, freshly ground black pepper and fresh thyme – this is where I used "my darling lemon thmye" that makes this dressing extra special and lemony tasting.Then top with some hard goat cheese.  I also added a bit of cress for a bit of sharpness. This is a very elegant dish and I loved serving it on a large white platter that I placed in the middle of the table so everyone could serve themselves.


The third recipe for May are the very summery and bright green looking Garlicky, minty mushy peas (page 387) from the chapter of „Side Dishes“. Lots of green color from the peas (frozen – as the fresh ones were not appealing – not quite the best season yet) – I do not think that the taste of this dish is affected by frozen versus fresh peas.


All you need apart form those peas is some of the cooking liquid, shallots, garlic, salt, pepper and mint (no – I used Italian parsley because mint and fresh coriander are the only herbs that we do not like in our food). And some fresh vegetables for dipping or a bit of bread to spread it on. Next time I make this, I would love to add some of the pea purée to my salmon burgers, I think that would make a darn good taste combination and be very pretty to look at too.


The fourth recipe is the Courgette bruschetta (page 200) from the chapter of „Bready Things“.  A recipe that I turn to quite often. Love bruschetta and fresh courgettes and grilled bread and goat cheese. Who does not?!


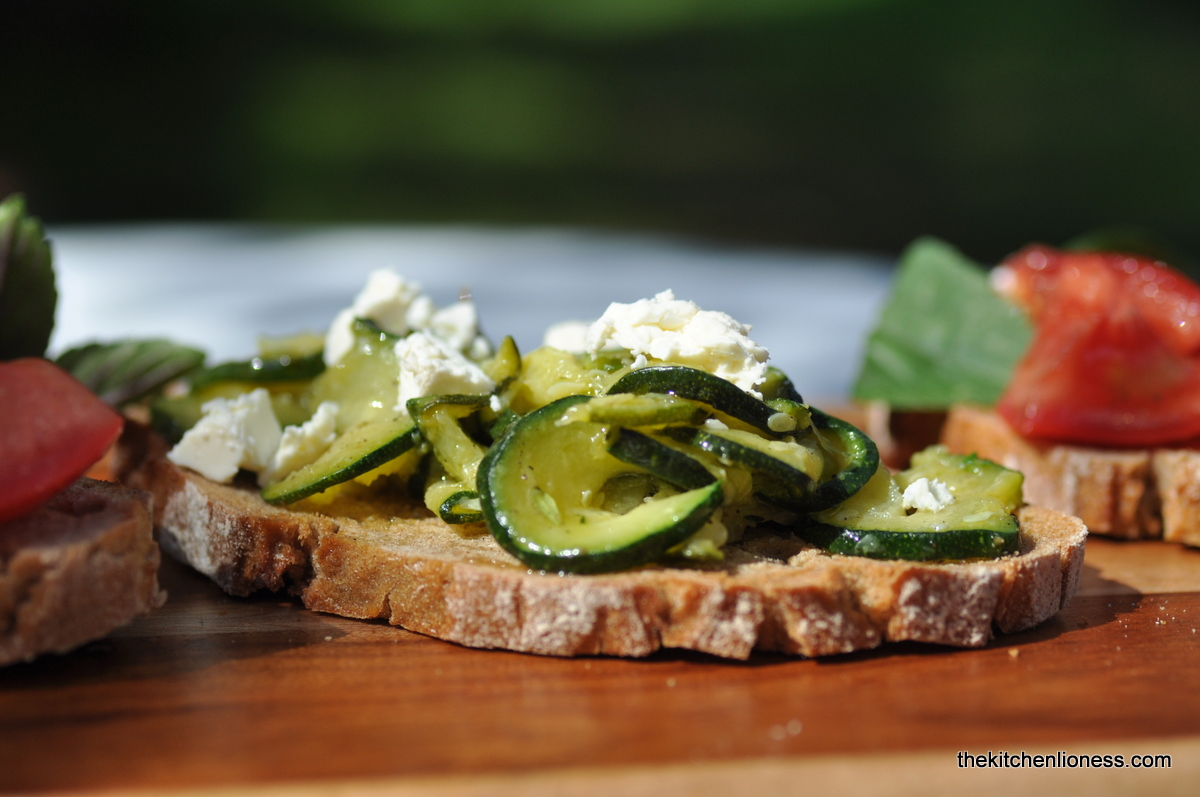
This bruschetta pairs extremely well with tomato bruschetta and it is one of the true rustic treats to enjoy in late spring and then all summer long.


The fifth recipe is the recipe that I would consider to be a „must know“ for all of us, and especially students. The Pasta with Broccoli (page 261) from the chapter of „Pasta & Rice“ is so tasty and so easy to put together, that it is quite simply a cinch to put together. Plus it has very few ingredients and yet it is still one of those very tasty pasta recipes that will come in very handy on those very busy days/evenings when everyone is craving a nutritious home cooked meal with tons of taste.


Boil some fun shaped pasta, add fresh broccoli florets to the cooking water during the last few minutes (if you are pressed for time you can always add frozen broccoli florets here). Warm olive oil with some chili and garlic. Mix everything together. Add fresh basil and shaved parmesan on top and you are all set to enjoy a wonderful dinner.


The sixth recipe for May is the Griddled Asparagus with lemon dressing (page 339) from the chapter „Roast, Grill & Barbecue“.


We are in the midst of asparagus season around here. The season lasts „officially“ until the 24th of June. And presently there is asparagus everywhere. Each and every market offers it and we eat it almost daily. Since there is mostly white asparagus being planted here, that´s what I used for this lovely recipe.


The previously blanched asparagus gets threaded on skewers. Then you brush them with a bit of olive oil, season with salt and pepper and grill either in a griddle pan or on the BBQ outside – this is a recipe that works well wherever your grill or grill pan is.


Serve the hot asparagus with some lemon dressing poured over and some more on the side – so, so good. The dressing with the lemon juice and chopped basil, Italian parsley and chives complements griddled asparagus in the most delicious of ways.


Onto recipe number seven, one of my kids two favorites this month, the Herby, peanutty, noodly salad (page 71), from the chapter of“ Hearty Salads“.


For the noodles I chose to use wholewheat spaghetti instead of the egg or rice noodles that the recipe calls for – I like their nutty taste and that they hold their shape so well when cooked al dente and when paired with a hearty salad dressing.


The dressing consists of rice vinegar, zest and juice of a lime, chili, garlic, brown sugar, toasted sesame oil and soy sauce. The veggies I chose to add to the cooked noodles were green asparagus, string beans and an English cucumber. I replaced the coriander and the fresh mint with basil and the peanuts with sesame seeds – I did change the recipe according to what is available and fresh as well as to what we like. Nothing wrong with adjusting recipes to your family´s taste and preferences. It is a wonderful basic recipe that I think calls for some creative interpretations. I must admit that I really prefer a light dressing such as this one to one of those heavy ones with peanut butter added to it – I never liked those salads and was pleased as punch to prepare an Asian-inspired vinegary dressing for this one.


Recipe number eight is the top favorite recipe at our house this month – the Spicy merguez oven chips with yoghurt dip (page 225) from the chapter „Store-cupboard suppers“ is quite simply put a stellar recipe and, according to the kids, „out-of-this-world delicious“.


Use good potatoes here, the ones that can withstand a lot of heat without falling to pieces. And par-boil them only shortly before adding all those spices to them that are meant to mimic the spiciness of the French merguez sausages. And no need to peel the potatoes, if you give them a good scrub and especially if you bought them at a farmer´s market.


The spices used here are cumin, fennel, coriander, caraway, black pepper, Spanish sweet smoked paprika, cayenne pepper and fine sea salt. Time to get out my wonderful pestle and mortar once again, this is one kitchen gadget that although I do not use it too often, I actually love to use.


Roast potatoes and spices in a hot oven for about 45 minutes and prepare the dip in the meantime with plain yoghurt, a bit of garlic and some cayenne sprinkled on top. And. Enjoy!


Onto recipe number nine for May, the Cambodian Wedding Day Dip as Hugh calls it or the Tyrolean Wedding Day Dip as one of our daughters calls it (hence the bowl I served it in). The recipe can be found on page 299 in the chapter „Mezze & Tapas“.


The dip is wonderful with pita chips or fresh vegetables on the side and consists of chestnut mushrooms, chili, garlic, curry powder (I used a mild one), crunchy peanut butter, coconut milk, lime juice, soy sauce and chopped coriander (I used Italian parsley here).


We loved the bit of heat from the chilis, the sweetness from the peanut butter and the creaminess from the coconut milk – an utterly delightful combination of flavors and textures, not to be missed when preparing your next mezze spread.


The last recipe is the Spinach, penne and cheese spoufflé – yes spoufflé, not soufflée (page 43) from the chapter of „Comfort Foods & Feasts“. With cooked pasta, fresh spinach, a sauce béchamel, grated cheese, egg yolks and beaten egg whites – this recipe had a few steps that you had to follow before it was ready to be baked in the oven. I decided to add some chopped fresh wild garlic to the spinach mix.


The kids loved it and I served it with some grilled chicken as a side dish – texture wise, this was my personal least favorite one of the line-up and I think I would be better off using a smaller vessel for t the spoufflé than I did but it was still worth making and I like the idea to use left-over pasta and spinach in a dish that the kids will happily eat.


Another month full of wonderful vegetable dishes – we certainly love the recipes from this cookbook.

Please note, that for copyright reasons, we do NOT publish the recipes. If you enjoy the recipes in our series, hopefully, the wonderfully talented and enthusiastic members of the Cottage Cooking Club and their wonderful posts can convince you to get a copy of this lovely book. Better yet, do make sure to join us in this cooking adventure! There is still time!


„The Kitchen Lioness – Home is where you can be yourself“


For more information on the participation rules, please go here.

To see which wonderful dishes the other members of the Cottage Cooking Club prepared during the month of April, please go here.


Monday, May 25, 2015

Elderflower Cake with Strawberry-Elderflower Filling and Elderflower Icing & Elderflower Cordial


Who does not love the delicate elderflowers that explode in gardens and hedgerows at this time of year. For me, their rich sweet scent is synonymous with early summer. It is said that "summer starts when elder trees burst into flower and ends in late August when the berries are ripe". The elderflowers are the creamy white flowers from the elderberry tree. They can be used to flavor cooked fruits or jams and have a particular affinity with fruits such as strawberries or rhubarb, which are in season at the same time as elderflowers. The flower heads can also be used to make cordial, which in turn makes a useful ingredient for adding to sauces, creamy desserts, ice creams and jellies.


Our ancestors who lived in the country wore a sprig of elder in their hats to prevent being bitten by mosquitoes. Branches with the fragrant flowers were hung in stables to discourage flies. Elder was traditionally planted around dairies too, because it was believed to keep the milk from turning. The lacy blossoms have an unmistakable Muscat grape fragrance. They are also delicious dipped into a light batter and fried until crisp – I make elderflower fritters every year (here). Or stir a few flowers into cake and muffin batters to give them a light, sweet scent.


Around here, early summer would not be the same without making elderflower cordial. It is easy to make with freshly gathered elderflowers, which are infused with nothing but organic lemons, sugar and water. Remember that the best time to pick elderflowers is on a dry, warm day when the blooms are newly open, well away from traffic fumes. If you gathered these lovely flowers, all you need to do before using them is to give them a gentle shake to dislodge any insects and rinse briefly in cold water before using.


Some things are made for one another. The joyful relationship between elderflowers and the equally festive strawberries is perhaps a less well known one than rhubarb and strawberries.  Once you know to add elderflowers to your stawberry recipes there will be no going back. I make strawberry and elderflower crumbles, sorbets and jams or add elderflowers to my strawberry-rhubarb pies, while the short season lasts. To scent your jams with elderflower, you either add some elderflower cordial to it OR add some flowers that you can strain out of the jam before canning it.


This cake is just a basic génoise sponge. The cake is light and delicate. It is not difficult to make, providing you follow the instructions carefully. For best results, use an electric whisk, which will add the air and volume the cake needs to help it rise without the aid of baking powder. You can also use the sponge mixture to make a fabulous and equally wonderful Swiss roll with strawberry-elderflower filling.

Elderflower Cake with Strawberry-Elderflower Filling  & Elderflower Icing

Ingredients for the Cake
  • 115 grams (1 stick) unsalted butter, melted, slightly cooled, plus more for the cake pan
  • 200 grams (1 cup) super fine (baking) sugar, plus more for the pan
  • 2 tsp. pure vanilla sugar (or 1 tsp pure vanilla extarct)
  • 190 grams (1 1/2 cups) wheat flour, sifted
  • 1/4 tsp fine sea salt
  • 6 eggs (L), organic or free range

Ingredients for the Strawberry-Elderflower Filling

  • 450 grams (1 pound) local strawberries, washed, hulled, quartered NOTE: you could also add some late season rhubarb to the jam filling and you can strain some or all the seeds out of the jam filling or leave them in. This time I strained out most of the seeds.
  • 50 grams (1/4 cup) sugar
  • 2 tbsps elderflower cordial (preferably homemade, recipe below) OR add a couple of elderflower sprigs when cooking the fruits for the filling, removing them at the end

Ingredients for the Elderflower Icing

  • 200 grams (2 cups) icing sugar
  • 2 tbsps cream (or more)
  • 1 tbsp elderflower cordial (preferably homemade, recipe below)
  • a few large heads of fresh elderflower  and a few more elderflowers , to decorate


Preparation of the Cake
  1. Preheat your oven to 175 degrees Celsius (350 degrees Fahrenheit).
  2. Butter a 26-28 cm (10-11") - diameter springform cake pan. Line the any excess.
  3. In a medium bowl, whisk together flour and salt. Set aside.
  4. Break the eggs into a large heatproof mixing bowl and add the sugar and vanilla sugar. Place over a saucepan of simmering water (take care as the bowl should not touch the hot water).
  5. Heat, whisking constantly, until sugar is dissolved and mixture is warm to the touch, about 4 minutes. NOTE: to test whether the sugar has dissolved enough, you can dip two fingers in the warm egg-sugar mixture and rubbing it, it should feel smooth, not grainy, indicated that the sugar is dissolved properly
  6. Remove bowl from heat and wipe the condensation off the bowl with a tea towel. 
  7. Using an electric mixer on high speed, beat egg mixture until it is pale and tripled in volume, about 5 minutes. NOTE: the mixture should be pale and mousse-like, meaning that it should be thick enough to leave a ribbon trail on the surface when the whisk is lifted.
  8. Gently fold reserved dry ingredients into egg mixture in 3 additions, then fold in melted butter. It is important to do all this as quickly and lightly as possible, so you do not want to lose too much air.
  9. Scrape the batter into the prepared baking pan and smooth top.
  10. Bake the cake until golden brown and and beginning to shrink from the sides of the pan, about 30 to 40 minutes.
  11. Transfer pan to a wire rack and let cake cool in pan before turning out. Then turn the cake and continue with the recipe.


Preparation of the Strawberry-Elderflower Filling
  1. Bring strawberries, sugar, and the elderflower cordial to a simmer in a medium saucepan.
  2. Crush berries with a fork to release more juices and simmer until berries are completely soft and mixture resembles a coarse jam, about  5 to 8 minutes. NOTE: if you want, you can strain the seeds out now. 
  3. Transfer to a medium bowl and let cool completely.
  4. Using a long serrated knife, slice the cooled cake in half horizontally.
  5. Spread the cooled strawberry-elderflower mixture over bottom layer of cake and place top layer over strawberry mixture. NOTE: if you have any leftover filling, you could spoon the jam carefully into hot, properly sterilized jars and either process the jars or seal and keep refrigerated. If refrigerating, use the jam within a week or two.

Preparation of the Icing

  1. To make the icing, sift the icing sugar into a small bowl and stir in the elderflower cordial and enough cream to make a fairly thick but spreadable icing. 
  2. With an offset spatula, spread it over the top of the cake, letting it run down the sides a little.
  3. Let stand at room temperature until set, at least 30 minutes.
  4. Decorate with a few elderflower petals, if using, just before serving. NOTE: this cake can be made one day ahead. It should be stored covered at room temperature - but then leave the elderflowers off just until serving. NOTE: please do keep in mind that while elderflower petals can be consumed raw and uncooked, elderberries should not.


Elderflower Cordial
(makes about two liters)

Ingredients for the Cordial
  • elderflower heads about 50, freshly picked
  • 4 organic lemons, washed
  • 2 liters boiling water
  • 1 kg (5 cups) granulated sugar

Preparation of the Cordial
  1. Pick the flowers first thing in the morning before they are fully open, on a dry day. Choose a tree that is full of flowers, as this will mean the majority of flower heads are in their prime and the distinct Muscat scent should be quite noticeable.
  2. Choose the whitest heads and snip them at the base of the flowers, keeping the heads whole. 
  3. Shake them gently to remove any insects.
  4. Wash the elderflowers thoroughly by leaving them to soak in a sink of cold water. This will not affect their flavor and they are easy to shake dry. When you are certain that they are clean, continue with the recipe.
  5. Place the elderflower heads in a large bowl. Slice 2 of the lemons, add them to the bowl and pour over the boiling water. 
  6. Cover the bowl with a tea towel and leave overnight to infuse.
  7. The next day, strain the infusion through a muslin cloth into a saucepan. 
  8. Juice the 2 remaining lemons, then strain the juice into the saucepan. 
  9. Add the sugar and heat gently, stirring frequently, until the sugar has completely dissolved. 
  10. Simmer for a few minutes, until the mixture reaches 90 degrees Celsius (190 degrees Fahrenheit) on a sugar thermometer. 
  11. Pour the hot syrup into sterilized bottles and seal. 
  12. The cordial should keep for a year.

NOTE I.
: To dilute the cordial, I suggest four parts sparkling or still water to one part cordial - you could also opt for a bit of ginger ale here.
NOTE II.: If you cannot find any elderflowers for the decoration of my Elderflower Cake or the homemade Elderflower Cordial, chose a really good-quality storebought cordial instead and leave the flowers off the cake.


At this time of year, it is certainly worth collecting fresh elderflowers and experimenting with them in your recipes. You will be delighted with the distinct flowery note that they add to your baked goods, drinks and dessert. Trust me.


Friday, May 22, 2015

Final Recipe for French Fridays with Dorie - Chicken in a Pot: The Garlic and Lemon Version


Today´s final recipe for the French Fridays with Dorie group is "Chicken in a Pot: The Garlic and Lemon Version". Cooking everything together at once allows the ingredients and flavors to meld and complement each other in a way they do not when prepared separately. This dish is quite simply a one-pot wonder.


To prepare a chicken this way, you will need a large casserole pot with a fitted lid - what a more fitting recipe than the last one to use my beloved bright cherry red Staub Cocotfe again. And although the prep takes a bit of time, the chicken itself needs only about an hour in the oven.

The first step for me was the preparation of a pizza dough for the bread rim using white spelt flour, water, a bit of sugar, mild olive oil, and sea salt. While the dough was resting in a warm place (sunshine on the terrace), I browned the vegetables that Dorie´s recipe calls for, namely the cloves from four entire heads of garlic, French shallots, celery, carrots and teeny tiny fingerling  potatoes – instead of the sweet potatoes – because the kids are crazy about those fingerlings and because they are in season around here and hold their shape well when cooked in a lot of liquid. Then I browned the chicken on all sides. Placed the veg in the casserole, then the chicken around and on top the veg, added lots of lemon thyme and rosemary from the garden, some dry white wine, chicken stock and one cut up organic lemon (instead of the preserved lemon which I could not get my hands on today).


By the time I had finished those steps for the recipe, the dough had risen enough. I formed it into a large rope, draped it around the rim of the cocotte, placed the lid on top and into the oven it went for a good hour. I lightly oiled the rim of the pot before pressing the dough on the rim - I thought I would not be able to break the bread rim off otherwise. But that was probably not necessary.

Then it was time for the reveal – carefully pried the lid open with a screwdriver (following Dorie´s advice) and marvelled at the results.


Pot-roasting/braising chicken this way makes it incredibly moist and all that garlic only subtly flavors the chicken but does not overpower it. The herbs lend a nice flavor as well – especially that fabulous lemon thyme. And the vegetables still had enough bite so that they did not fall apart when served – lots of liquid to be mopped up with parts of that bread rim and some additional baguette.


You can either carve the bird at the table, then remove the legs first, then carve off the breasts. If you are not confident of dividing the chicken at the table, you could quite easily do it in the kitchen before spooning over some of the cooking liquid and serving some of the veg alongside, but the dish then loses a bit of dramatic effect.

We enjoyed this recipe and it was a wonderful and fun method of cooking on this Friday when I had these bittersweet feelings as this particular recipe marks the very last recipe that we cooked from this wonderful (and very my very worn) cookbook.

Cooking along with the other members of the French Fridays with Dorie group has been an experience that I would not want to have missed!

Who would have thought that I would be able to follow along for a few years and manage to make a lot of these dishes in my (yes, indeed) very small German kitchen?!

Thanks to all of you kind and thoughtful Doristas for letting me be part of this unique online cooking group that!

There is lots out there that I am looking forward to achieving in the future…and I will „see“ a few of you there…


To see whether the other members of the French Fridays with Dorie group enjoyed this week´s recipe, please go here.

For copyright reasons, we did not and do not publish the recipes from the book. But you can find the recipe for the Chicken in a Pot: The Garlic and Lemon Version on pages 206-08 in Dorie Greenspan´s cookbook "Around my French Table".

Friday, May 15, 2015

Jamie Oliver´s Food Revolution Day 2015: Foraging for Wild Garlic, a Quiche & a Picnic


Today, Friday May 15th, 2015 marks the fourth annual Food Revolution Day. This is a day of global action created by Jamie Oliver and the Jamie Oliver Food Foundation to engage and inspire people of all ages to learn about food and how to cook it. This year, Food Revolution Day is a global campaign to put compulsory food education back on the school curriculum. Jamie Oliver passionately believes that by educating children about food in a fun and engaging way, we can equip them with the basic skills they need to lead healthier, happier lives, for themselves and their future families.

So today´s task for the French Fridays with Dorie group is to choose a recipe or a technique we have learned from Around my French Table that we think is a “must know”.


First off, I have to admit that around here getting (other people´s) children interested in learning about the foods they eat and the way to prepare them, is not always the easiest of tasks and it is a bit like walking a fine line between wanting to teach children and being considered a bit of a show-off. My dear fellow compatriots always look for what they call "qualifications" - what exactly "qualifies" you to teach my children about food...you are what...a food blogger...who is Jamie Oliver (he does speak English after all)...what exactly is the "what do you call this"...Food Revolution Day...(I shall spare you the rest, which oftentimes includes some very discernible smirks...). Unfortunately, there was also no way I could have cooked with children in the school´s kitchen. No such luck as there are the present holidays, the lack of insurance, etc. And my own personal kitchen is most definitely too small.

But I have participated for the third time this year, albeit in a more quiet way. I believe that I have taught our own children so much about food in the last couple of years, that I am quite sure that they will grow up to make a lot of right choices when it come to their eating habits.


So, to stay true to my own philosophy about food, food preparation and ingredients and to share a passion of mine - we decided to particpate this year by inviting a small group of our children´s friends over for a walk through our favorite park and some "hands on education" about local herbs and wild plants - for today we chose to concentrate on wild garlic.


Wild garlic can be found in meadows all over this country in April and May. It has a wonderful earthy flavor. Around here you can even stumble across some at a local park, as we did, so make sure to keep your eyes open. But if not, you should be able to get hold of some wild garlic at good green grocers or your local farmer's market. You can also sort of mimic the flavor of wild garlic by adding some fresh young spinach and a couple of cloves of regular garlic to this quiche, so you still get a wonderful garlicky taste.


We were lucky with respect to the weather - a gorgeous day - and spent the day playing, learning about lots of different local wild plants and herbs, picking fresh wild garlic and enjoying an absolutely delicious Wild Garlic and Ham Quiche. Here is where today´s assignment comes in, I used Dorie Greenspan´s Tart Dough (page 498-9) that I think absolutely every child/student can learn how to make and should know - there is no, absolutely no end to the possibilities of what you can add to quiche. But I have a very soft spot for this particular quiche. I love, love using seasonal, local herbs in my cooking and try to share that passion with our children. It is so important to show children that some of the best ingredients grow right in front of their noses, all they have to do is learn about them and always keep their eyes open. An important lesson. No doubt.


There is no better place to enjoy a piece of still warm quiche (I wrapped them in towels and more towels) while sitting in your favorite local park - just ask my very happy picnic participants.


Time to relax with good, homemade food and share it with family and friends must be one of the great luxuries of life.


Taking our Food Revolution activities outside was a great idea - something that I am looking forward to repeating - Mother Nature has so much to offer and it is certainly a more relaxed environment for everyone than my teeny, tiny kitchen.


So, equipped with copies of Dorie´s Tart Dough recipe (in the translated version, of course)  as well as The Kitchen Lionesses Wild Garlic and Ham Quiche recipe and bags full of freshly picked wild garlic - to make their own quiches at home -  I believe our own reflective, more quiet version of the Food Revolution Day 2015 was a nice success.


To see what initiative the other members of the French Fridays with Dorie group came up with on this day, please go here.

To take a look at Dorie Grenspan´s recipe for the Tart Dough, you can go here.

To get s copy of my Wild Garlic & Smoked Ham Quiche, just stay tuned.

By educating children about food in a practical, fun and engaging way, we can provide them with the knowledge and skills they so urgently need to lead healthier, happier lives. We need to make practical food education a compulsory part of every school curriculum across the world, and that’s why I’ve launched a petition calling on all G20 countries to action this. With enough support from millions of people around the world, I truly believe that we can create a movement that’s powerful enough to make governments take action.” Jamie Oliver

Hear, hear!