Friday, September 28, 2012

Pear Semolina Loaf Cake with Pear Butter and Walnuts


If you have ever made Pear Butter yourself or received it as a gift, or found and bought it at a store, you will already know that this is a delicious spread on toast, French toast or pancakes or waffles. It can also be heated and spooned over vanilla ice cream. Simply delicious! When you make pear butter at home, you can add wonderful warm spices such as ginger, cinnamon, vanilla or even ground cloves or cardamom, whatever suits your taste best and feels just right at this time of year. You can either can the pear butter or store it in a jar in the refrigerator. But you can also use the pear butter in baking. It will add a wonderful flavor , golden color and a bit of a different sweetness to your baked goods.


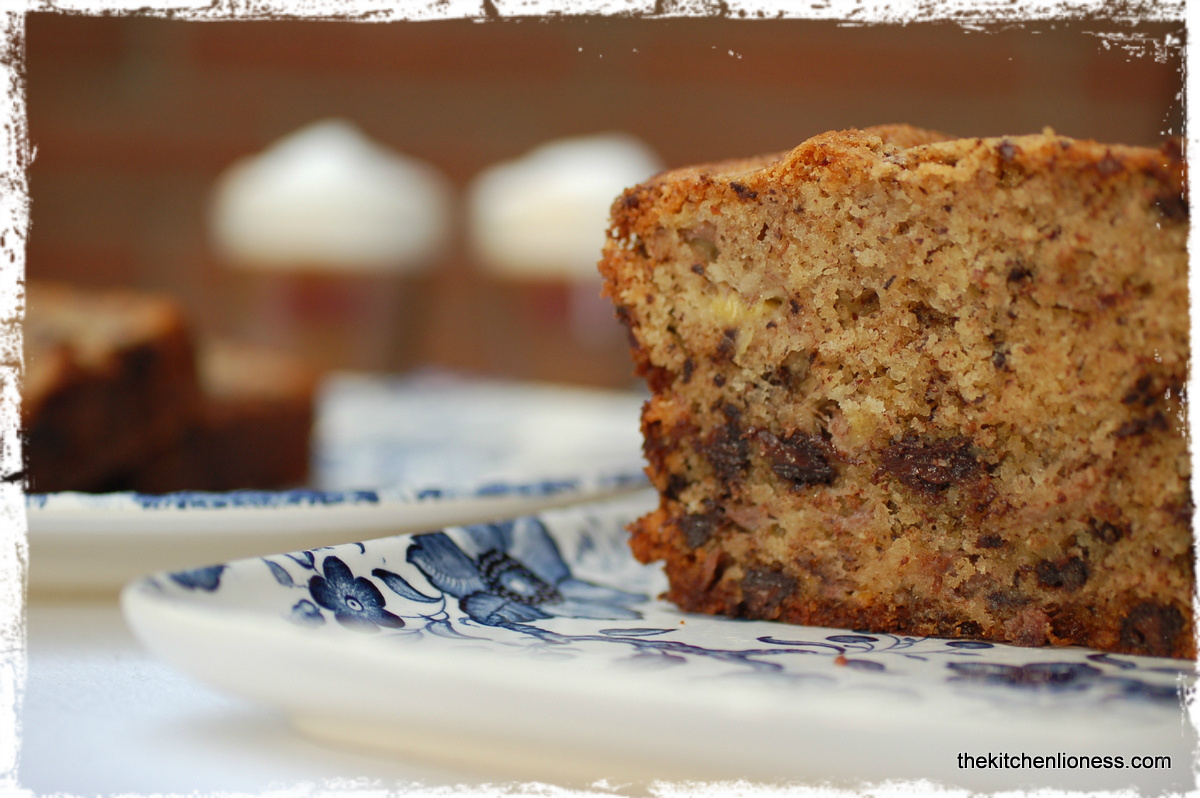
Made with fragrant fall pears, new harvest walnuts and pear butter, this moist cake with a slight crunch from the semolina flour (or fine cornmeal) is easy to whip up for any family occasion.


Pear Semolina Loaf Cake with Pear Butter and Walnuts

Ingredients

  • 6 eggs (L), free range or organic if possible
  • 80 grams (1/3 cup plus 1 tbsp) super fine sugar
  • 1 tsp pure vanilla extract
  • 200 grams (7 ounces) unsalted butter, room temperature, plus extra for buttering the pan
  • 50 ml freshly squeezed orange juice (you can also use apple or pear juice)
  • 3 tbsp pear butter (preferably homemade)
  • one pinch fine sea salt
  • 125 grams (1 cup) AP/plain flour, plus extra for flouring the pan
  • 3 tsp baking powder
  • 150 grams (1/2 plus 1/3 cup) semolina flour (or fine cornmeal)
  • 50 grams (1/2 cup) shelled and chopped new harvest walnuts
  • 2 ripe but still somewhat firm pears (you have to be able to grate them), I used Conference pears


For Serving

  • some confectioners´ sugar (optional)
  • some pear butter


Equipment

  • loaf cake pan ( 30 x 11 centimetres/ 12 x 4.5 inches)
  • parchment paper, preferably unbleached 


Preparation

1.  Preheat your oven to 180 degrees Celsius (350 degrees Fahrenheit).
2.  Brush a loaf cake pan with butter. Line the base and side with parchment paper, butter and flour again, shacking out the excess.
3. Separate the eggs. Put the egg whites aside for a moment.
4. In the bowl of your electric mixer, beat together the egg yolks, with the sugar, vanilla extract and butter until thick, yellow and creamy.
5. Scoop the pear butter into a small bowl, heat it ever so slightly in the microwave, add the juice and stir until combined. Then add the pear butter mixture to the creamed egg mixture and cream a bit more until all is combined.
6. In a clean bowl, beat the egg whites together with a pinch of sea salt until stiff peaks form and set aside.
7. Sift together the flour, semolina flour, baking powder over the butter mixture and gently fold until just combined.
8. Peel the pears, quarter and core them. Then using the large holes of the box grater, grate the pears.
9. Using a spatula gently fold the grated pears, the egg whites and the walnuts into the batter, alternating.
10. Spoon the cake mixture into the prepared pan and smooth the surface.
11. Bake in oven for about 1 hour to 1 1/4 hours or until a skewer inserted into the center comes out clean. If the cake browns too quickly, cover with a piece of parchment paper and some aluminium foil.
12.  Take the cake out of the oven and cool in the baking pan on a wire rack. Wait at least 30 minutes before taking out of the baking pan.
13. Cool completely before dusting with confectioners´  sugar and cutting into slices.
14. Serve with extra pear butter, if desired.


This Pear Semolina Loaf Cake with Pear Butter and Walnuts is a very “unassuming cake” but it does make a lovely teatime treat! And it is particularly wonderful if you serve some extra pear butter alongside the sliced cake!


French Fridays with Dorie - Endives, Apples and Grapes


Today`s dish for the French Fridays with Dorie group is “Endives, Apples and Grapes”.


Endives are called “Chicorée” around here and are quite popular. Endive is a member of the chicory family, which includes radicchio, escarole and curly endive and was first cultivated in Belgium (starting in 1846).  There is white as well as red endive. Endive is rich in vitamins A, B, C and K, high in fiber and a good source of beta-carotene and potassium. Perhaps the most versatile member of the lettuce family, it is great in salads, used as scoop for dips, sautéed, braised, baked or grilled. For this recipe, I used wonderful fresh white endive from a local endive grower ( http://www.deutscher-chicoree.de). As endives are grown in total darkness, it is fantastic to visit the company and take a tour of the endive growing facilities. After the tour, you can buy bags full of the freshest endives available anywhere and feel good about preparing a dish with local produce. And after you have shopped for endives, you can go and pay a visit to the apple famers in the neighborhood and pick up some local apples as well. Wonderful!


Dorie´s recipe calls for cooking the endives, apples and grapes slowly in salted (French) butter (I used “La Motte de Président") until soft and caramelized. We enjoyed this recipe with roast chicken and rosemary potatoes, delicious. We loved the caramelized endives and apples and the sweet “wilted” grapes. A keeper for sure!


To see how the other Doristas prepared the “Endives, Apples and Grapes”, please click here.


Wednesday, September 26, 2012

Muffins in Space


While reading and looking at a book about “Space” with the children, I had the idea of baking some chocolate muffins, decorate them with chocolate robots and then let the kids have some fun with their dessert – this is how the idea for the “Chocolate Muffins in Space” came about. The muffins were delicious, I used my tried and true recipe. The kids love using all kinds of molds for preparing chocolate decorations, by now, they have turned into real “pros” when it comes to melting the chocolate and filling the molds. It was a fun afternoon filled with baking and books and chocolate and photo taking.


Chocolate Muffins in Space
(recipe for about one dozen)

Ingredients for the Chocolate Muffin Batter

  • 3/4 cup unsweetened dark cocoa powder, try to find a really good quality one (I use Dutch cacao, such as Van Houten or Bensdorp)
  • 3/4 cup AP flour
  • 1/2 tsp baking powder
  • 1/4 tsp fine sea salt
  • 1 1/2 sticks unsalted butter, room temperature
  • 1 cup super fine white sugar
  • 3 eggs (L), organic or free range
  • 1 ½  tsp pure vanilla extract
  • 1/2 cup sour cream, room temperature


Ingredients for the Topping and Decoration

  • about 5 ounces white chocolate, chopped  (I used white “Lindt Excellence with Vanilla”)
  • about 3.5 ounces dark chocolate, melted, you could add about one tbsp shortening when melting the chocolate


Equipment

  • one regular muffin pan
  • 12 or more good quality greaseproof muffin liners
  • ice cream scoop (or spoons) for filling the muffin liners
  • chocolate mold for the chocolate decorations


Preparation of the Muffins

1. Preheat your oven to 350 degrees Fahrenheit.
2. Line a 12-cup standard muffin tin with paper liners. I like to use sturdy muffin liners, the baked muffins will be easier to decorate once they have cooled.
3. In a medium bowl, sift together the cocoa, flour, baking powder, and salt and set aside.
4. With your electric mixer cream butter and sugar until light and fluffy.
5. To the butter mixture, add the eggs, one at a time, beating well after each addition, then beat in the vanilla extract.
6. With mixer on low speed, add the flour mixture in two batches, alternating with sour cream - beginning and ending with the flour.
7. Using an ice cream scoop or spoon, fill the muffin liners - the muffin liners should not be completely full (about ¾) as the batter will rise during baking.
8. Bake for about 18 to 20 minutes, the tops should spring back when touched.
9. Cool in the muffin pan on a rack for about 5 minutes, then carefully transfer to a wire rack to cool completely.


Decorating the Muffins

1. Make sure that the molds are completely dry before using.
2. Melt the white chocolate in a small bowl in the microwave, making sure that the chocolate does not get too hot.
3. Using a spoon, fill the molds with the chocolate, being careful not to spill the chocolate over the edges or use the back of a kitchen knife to scrape off the spilled chocolate while it is still warm.
4. Tap the mold lightly on the work surface in order to eliminate air bubbles.
5. Place the mold in the fridge for about 20 minutes or until the chocolate hardens.
6. Remove the chocolates from the mold by applying light pressure to each single cavity of the mold. Set aside for a moment to prepare the dark chocolate topping.
7. Place the chopped chocolate or chocolate chips and shortening in a medium heat-proof bowl. In a separate large heat-proof bowl, put very hot water. Carefully place the bowl with the chocolate into the bowl with the water - the water should come halfway up the side of the chocolate bowl.
11. Stir the chocolate and shortening with a rubber scraper until both are melted and the resulting mixture is smooth. Remove the chocolate bowl from inside the water bowl.
12. Taking one muffin at a time, dip into chocolate mixture, gently tap on the counter to “level” the chocolate and just before the chocolate sets, decorate the tops of the muffins with one white chocolate “robot" each.


Sources:


Friday, September 21, 2012

NIGEL SLATER`S SEPTEMBER CAKES PART III - Plum Pudding Cake


The Plum Pudding Cake is the third recipe in my Nigel Slater September Cakes Series. I adore moist cakes studded with plums. This cake is another comfort style, mid-week, everyday kind of cake from Nigel Slater. It is a sweet and spicy treat, more like a “pudding” than a cake. Great with an afternoon cup of tea. I decided to bake this Plum Pudding Cake with the green “Reine Claude plums" (also known as Greengage plums) from France. They taste wonderful and I love their color, it is a nice contrast to the dark gingerbread style kind of cake that we all enjoyed tremendously and that I will bake again soon but using the last of the Italian plums that are still available but will disappear soon for the season.


When you read the recipe for this pudding style cake, you will notice that it calls for three different kinds of sweetener, namely, golden syrup, thick honey, and muscovado (or light brown) sugar. You might think that these sweeteners will be too much but they actually each bring a different flavor to baked goods, and together, they give this cake real depth and warmth. And since the plums are not the sweetest of fruits, this cake will taste just right – do not change any of the components and if you can, use a good, thick and wonderful local honey in the batter, it will be even more of a delicious autumnal treat!


Nigel Slater's Plum Pudding Cake
(as adapted from Tender, Volume II)

Ingredients for the Cake Batter
  • 250 grams (2 cups) AP flour
  • one slightly heaped tsp baking powder
  • one level tsp baking soda
  • one slightly heaped tsp ground cinnamon
  • one slightly heaped tsp ground ginger
  • one pinch of fine sea salt
  • 200 grams (2/3 cups) golden syrup
  • 2 heaped tbsp thick honey
  • 125 gram (1 stick plus 1 tbsp) unsalted butter, plus some for buttering the baking pan
  • 125 grams (3/4 cup) muscovado sugar (you can substitute light brown sugar)
  • 350 grams (12 ounces) plums (I used green “Reine Claude plums" but feel free to use other vatieties)
  • 2 eggs (L), organic or free range if possible
  • 240 ml (1 cup) whole milk, room temperature

Ingredients for the Plum Topping
  • 5 plums (or more, depending on whether you would like to have some extra for serving)
  • one tbsp light muscovado (or light brown sugar) sugar
  • one tbsp unsalted butter
  • one tbsp syrup from a jar of stem ginger (you could also substitute a bit of ground ginger)


Baking Equipment
  • a 24 cm (8 x 8 or 9 x 9 inch) square baking pan
  • parchment paper (unbleached if possible)

For Serving (optional)
  • clotted cream, crème double/double cream 

Preparation of the Cake

1. Preheat your oven to 180 degrees Celsius (350 degrees Fahrenheit).
2. Use parchment paper to line your 24 cm (8 x 8 or 9 x 9 inch) square baking pan.
3. Whisk together the flour, baking powder, baking soda, cinnamon, ginger and salt in a large bowl.
4. In a small saucepan, combine the golden syrup, honey and butter  and melt over medium-low heat, stirring frequently.
5.When the butter has melted completely, stir in the muscovado (or light brown sugar) sugar. Set aside and allow to cool slightly.
6. Halve the plums, or cut them into quarters and remove the stones.
7. Whisk together eggs and milk in a separate bowl.
8. Add the syrup-butter mixture to the flour and stir to combine.
9. Pour the egg-milk into the flour mixture and continue to stir, until you have no more traces of flour left.
10. Pour the batter into the baking pan. NOTE: the batter will be liquidy!
11. Evenly distribute the plum quarters/halves across the top. NOTE: the plums will sink to the bottom.
12. Bake the cake for about 35 minutes, then cover loosely with foil and bake for an additional 10 to 15 minutes or longer, depending on the ripeness of the plums used.
13. Transfer the baking pan to a wire rack and cool for at least 30 minutes before lifting the cake out of the baking pan.
14. While the cake is cooling, you can prepare the plum topping.


Preparation of the Plum Topping

1. Halve and de-stone the plums (you can also quarter the plums) and place them in a saucepan.
2. Add the sugar, butter and the syrup from a jar of crystallised ginger (or ground ginger) and stir.
3. Cover and leave to cook down for a while (time depends on how “cooked down” you want your plums to be).


Serving the Cake

1. Cut into squares.
2. Top each piece of cake with a dollop of cream and a generous topping of the spicy plums.
3. Serve any remaining plum topping on the side.


Sources:


  • This recipe was adapted from "Tender: Volume II - A Cook`s Guide to the Fruit Garden" (Sep. 16, 2010) Nigel Slater (Author), Jonathan Lovekin (photographer), available at http://www.amazon.co.uk/. The US edition is called “Ripe – A Cook in the Orchard” (April 10, 2012 and is available at www.amazon.com).
  • Muscovado sugar and golden caster sugar from Tate & Lyle (available for example at http://www.english-shop.de)


Substitutions for Golden Syrup:

Combine two parts light corn syrup plus one part molasses OR equal parts honey and corn syrup OR maple syrup. If you like, try reducing the corn syrup in a saucepan to thicken it. NOTE: This is thinner and not quite as sweet or flavorful as golden syrup.


French Fridays with Dorie - Chicken Basquaise (Poulet basquaise et Pipérade)


Today`s dish for the French Fridays with Dorie group is „Poulet basquaise et Pipérade“.


This is a delicious combination of chicken, sweet peppers and rice that is typical of all the regions around the Mediterranean. Well, as the name of the dish suggests, this is a dish from the Basque region of France. The first step is the preparation of Dorie´s recipe for Pipérade *  (basically a vegetable stew), a mix of onions,  sweet green and red peppers (I did not use green peppers but red and orange ones), tomatoes and garlic with the addition of some spicyness from piment d´ Espelette, the Espelette pepper, "Ezpeletako bipera" in Basque language and then some herbs, namely thyme and a bay leaf.  The second step is the browning of the chicken, some wine to get all the chicken flavor (without the fat) from browning the chicken. Then you add the browned chicken pieces to the Pipérade and cook the chicken nestled in the vegetable mix until the chicken pieces reach fall-off-the-bone doneness. It is customary to serve this dish with white rice but in a lot of different French versions of this popular recipe, I have also seen noodles or potatoes served alongside.

We had some oven-roasted cauliflower with garlic, olive oil, lemon juice and capers alongside and I bought some fresh French baguette to mop up the remaining Pipérade.


This is a very colorful dish, bursting with glorious mediterranean flavours (for those pepper-tomato lovers) .It is easy to make and all of the ingredients are readily available.

When combined with rice, this is a superb supper any time of the year, again if you generally enjoy pepper-tomato based sauces. It is also fun to vary the heat of the dish with your pepper choices!

* Definition of Pipérade:
according to the "fooddictionary", this dish hails from the Basque region of France and has many versions that are always based on tomatoes and peppers cooked in olive oil with possible additions from onions, garlic, ham, bacon or other vegetables and even lightly beaten eggs. Pipérade can be served as a main dish as well as a side dish.

To see how the other Doristas prepared the “Poulet basquaise et Pipérade”, please click here.


Tuesday, September 18, 2012

NIGEL SLATER`S SEPTEMBER CAKES PART II - Cinnamon Pear Cake with Vanilla Fudge Sauce


There are so many delicious varieties of pears available right now, that it is hard not to buy too many. So why not give this wonderful Cinnamon Pear Cake with Vanilla Fudge Sauce a try. It is the second recipe in my Nigel Slater September Cakes Series. This cake is moist and studded with chuncks of ripe, sweet pears. It has a bit of a rustic appeal and is easy to prepare. And it is even a bit decadent, especially if you prepare the Vanilla Fudge Sauce as well and pour it over the cake just before serving it with a small scoop of a real good quality, or even homemade, vanilla ice cream. What a wonderful mid-week afternoon treat.


I love Nigel Slater´s recipes, sweet and savory. No matter which recipe I follow, I always appreciate the comfort food feeling they have. Same is true for this Cinnamon Pear Cake. It is worth trying to buy some good, ripe but still somewhat firm pears that are good for baking. And the finished cake will taste so much better if you use fresh, good quality cinnamon for the pear mixture.


Cinnamon Pear Cake with Vanilla Fudge Sauce
(as adapted from Nigel Slater, Tender II)

Ingredients for the Pear Mixture

  • 740 grams (1.6 pounds) ripe pears (I used 6 small “Conference” pears)
  • the juice of half a lemon
  • 40 grams (scant 3 tbsp) unsalted butter
  • 3 tbsp unrefined light muscovado sugar (you can substitute light brown sugar)
  • ½ tsp (heaped) ground cinnamon (preferably from Ceylon)

Ingredients for the Cake

  • 200 grams (2 sticks minus 2 tbsp) unsalted butter, room temperature, plus some extra for the baking pan
  • 200 grams (1 cup) golden caster sugar (you can substiute light brown sugar)
  • 3 eggs (L), lightly beaten
  • 200 grams (1 2/3 cups) self-raising flour (you can substitute AP flour whisked together with 1 ½ tsp baking powder), plus some extra for flouring the pan
  • ½ tsp baking powder with saffron (you can use regular baking powder)

Ingredients for the Vanilla Fudge Sauce

  • 100 grams (1/2 cup plus 1 tbsp) unrefined light muscovado sugar (you can substiute light brown sugar)
  • 100 grams (3.5 ounces) golden syrup *
  • 50 grams (3 tbsp) unsalted butter
  • 150 ml (2/3 cup minus one tbsp) double cream
  • 1 to 2 tsps pure vanilla extract (adjust the amount of vanilla added to your personal taste)


Baking Equipment

a 24 cm (9 – 10- inch) spring form pan
some parchment paper (I always use unbleached natural brown parchment paper)

Preparation of the Pear Mixture

1. Preheat your oven to 170 degrees Celsius (325 degrees Fahrenheit).
2. Butter the spring form pan, line with parchment paper, butter and lightly flour the pan. Shake out the excess.
3.  Peel the pears, then halve, core and roughly chop them, dropping them into cold water acidulated with a good few squeezes of the lemon. It will prevent discoloring.
4. Melt the butter and muscovado sugar with the cinnamon in a shallow pan over a moderate heat, stirring occasionally.
5. Drain the pears and add them to the pan, taking care that they don’t spit at you. Let them cook in the melted butter and sugar until they are tender and the sauce is thick and coats the pears. Stop before the sugar turns dark and bitter. Set aside to cool.


Preparation of the Cake

1. To make the cake, put the butter and sugar in a food mixer and beat till light and creamy. It should be almost white.
2. Add the eggs and a little of the flour alternately, so that the mixture does not curdle.
3. Fold in the remaining flour and the baking powder, followed by the pears and their syrup.
4. Scoop the mixture into the buttered baking pan and with an offset spatula, smooth the top lightly.
5. Bake for about 45 minutes, till risen and golden, then check for doneness with a metal or wooden skewer; it should come out clean.
6. Remove the cake from the oven and leave to cool on a rack before taking it out of the baking pan.

Preparation of the Vanilla Fudge Sauce

1. To make the sauce, put the sugar, golden syrup and butter in a small, heavy-based saucepan and bring to a boil, stirring only enough to stop it sticking.
2. Stir in the cream and the vanilla and leave to cool so that the sauce has a chance to thicken.
3. To serve, put a slice of cake on each plate with a small scoop of ice cream, then pour over the fudge sauce. OR: pour the Vanilla Fudge Sauce directly onto the entire cake, let the excess drip off and serve a scoop of ice cream on the side with a drizzle of some additional sauce.


Sources:

  • This recipe was adapted from "Tender: Volume II - A Cook`s Guide to the Fruit Garden" (Sep. 16, 2010) Nigel Slater (Author), Jonathan Lovekin (photographer), available at http://www.amazon.co.uk/. The US edition is called “Ripe – A Cook in the Orchard” (April 10, 2012 and is available at www.amazon.com).
  • Self-raising flour (such as "Mc Dougalls" or "King Arthur"), muscovado sugar and golden caster sugar from Tate & Lyle (available for example at http://www.english-shop.de

Substitutions for Golden Syrup:

Combine two parts light corn syrup plus one part molasses OR equal parts honey and corn syrup OR maple syrup. If you like, try reducing the corn syrup in a saucepan to thicken it. NOTE: This is thinner and not quite as sweet or flavorful as golden syrup. 


Tuesdays with Dorie - Whole Wheat Bread


Today´s recipe for the Tuesdays with Dorie group is Whole Wheat Bread. It is nice to be baking bread. And it is nice to be baking bread with honey from a beekeeper that you know and sugar beet molasses (instead of malt extract) from a local company.


Craig Kominiak is the contributing baker for this recipe and it is a straightforward recipe, not difficult at all to follow the few steps required to bake this bread. The ingredients are but a few, namely yeast, honey, bread flour, whole wheat flour, a bit of oil (I used sunflower oil) malt extract (which can be substituted with molasses) and some fine sea salt. The honey flavor sweetens the baked loaves so that they are not only healthy to eat, but delicious, too. 


The bread can be enjoyed fresh or toasted with just some good quality butter and maybe some honey or you  can use it for preparing your favorite sandwiches. 


We liked this bread and I certainly appreciated the process of baking these Whole Wheat Loaves. We all loved the wonderful smell emanating from the oven while the two breads were baking. The crust is light  and the inside is soft with a slightly sweet taste.

Wonderful bread - light, tasty, and easy to make.


The hostesses for today´s recipe are Teresa of The Family That Bakes Together and Michele of Veggie Num Nums. A great big “Thank You” to both of them!

To see how the other Doristas baked wonderful Whole Wheat Loaves today, please click here.


Sources:


Monday, September 17, 2012

NIGEL SLATER`S SEPTEMBER CAKES - PART I: Black Banana Cake


Nigel Slater is a well-known British food writer, journalist and broadcaster. Before I cooked and baked my way through countless recipes in some of his numerous cookbooks, I read his autobiography, called "Toast: The Story of a Boy´s Hunger". This book is all about Slater´s deeply rooted love of food and it is one of the most wonderful contemporary books that I have read.

Since fall season is upon us and I wanted to bake a few basic, autumnal, delicious cake recipes, with a decided comfort food kind of appeal, I decided to put together a few posts on some of Nigel Slater´s  cake recipes that I call "September Cakes". 

The first cake that I chose for this series is a Black Banana Cake - similar to the well-known Banana Bread. As with Slater´s "Rhubarb Cinnamon Polenta Cake" that I featured in July of this year, my kids went crazy over this one, so I decided to forget all about the other Banana Bread/Cake recipes that I have tried before, from now on, I will be using only this simply delicious recipe.


Black Banana Cake
(as adapted from Nigel Slater)


Ingredients
  • 175 grams (6oz) unsalted butter, room temperature
  • 175 grams (6oz) sugar (half light muscovado, half golden caster) - you could substitute light brown sugar
  • 75 grams (2½oz) hazelnuts 
  • 2 eggs, (L) 
  • 175 grams (6oz) self-raising flour (you can also use AP flour with 1 1/2 tsp baking powder)
  • 2 very ripe "black" bananas (about 250 grams/9oz total weight)
  • 1/2 tsp pure vanilla extract
  • 175 grams (6oz) good-quality dark or milk chocolate chips (I used Lindt 70% Excellence, chopped)


Preparation

1. Preheat your oven to 170 degrees Celsius (325 degrees Fahrenheit).
2.  Line the base and sides of a 20cm x 12cm(8 inches x 5 inches) loaf pan with unbleached parchment paper.
3. In the bowl of your electric mixer, beat the butter and sugars until light and fluffy.
4. Toast the hazelnuts and rub them in a dish towel to remove their skins. Using your food processor, grind the nuts finely.
5. Slowly add the eggs to the butter and sugar mixture.
6. Then mix in the toasted ground hazelnuts and flour.
7. Peel the bananas and chop them into small pieces.
8. Gently fold the vanilla extract, the bananas and the chocolate chunks into the cake mixture, turning gently and taking care not to overmix.
9. Scoop the cake batter into the prepared baking pan.
10. Bake for between one hour to one hour 10 minutes, covering the cake with foil if the top starts to darken too quickly (I actually covered the cake 40 minutes into baking).
11. Transfer the cake to a wire rack and let cool before removing from the baking pan (I served the cake while it was still slightly warm and the chocolate had not completely hardened).
NOTE: if you can, try to use organic eggs, bananas and hazelnuts in this cake.

Baking Equipment

one  20cm x 12cm (8 inches x 5 inches) loaf pan
some parchment paper (unbleached natural brown if possible)


The smell of the cake while baking was just fantastic! This is a moist cake with bits of nuts and small chunks of dark chocolate and banana and it certainly has just the right kind of charming homemade appeal that I was looking for.

It is also a great way to use some overripe "black" bananas. And although there are countless recipes for banana cake, this is now our favorite version!

Enjoy with some coffee, steaming cup of tea or a tall glass of milk.


Sources:  


Friday, September 14, 2012

French Fridays with Dorie - Spice-Poached Pears


Today´s recipe for the French Fridays with Dorie group is Spice-Poached Apples or Pears. A classy dish.


The recipe is easy to make and the poached fruits will taste heavenly. I chose two different kinds of pears, first the “ Williams Bon Chrétien” – this variety has existed since 1770 (British origins) and second the “Conference” pear, a variety known since 1894 - just starting to appear in the stores for the season. With a bit of planning, it is easy to know how many days ahead you have to buy your fruit so that it will be perfectly ripe but not too soft for poaching.


The preparation of this recipe is straightforward. Place a good-quality honey, sugar, water, zest and juice of organic oranges and lemons, star anise, cinnamon stick, vanilla bean (and scraped seeds) into a pan over medium heat and bring to a boil. Reduce the heat to a simmer, then add the pears (or apples) and poach for 10-15 minutes, or until softened, but still firm. (Turn the pears frequently to keep them covered with the poaching liquid). Then you remove the pears and set aside. Bring the poaching liquid back up to a boil and cook until the liquid is reduced to a syrup, about 10 minutes.

To serve, place a pear into the center of a plate/dish and pour some of the poaching liquid around. Poached fruit go brilliantly with a whole host of things and therefore feel free to serve the fruit with a dollop of clotted cream, crème double, crème fraîche or ice cream.


Dorie´s recipe is delicious and both kinds of pears looked elegant on the plate and tasted superb! For the Christmassy smells alone I would give this five stars. The vanilla pods are very pricey but the star of the show in this dessert. They add a beautiful flecked appearance and yumminess. When I shopped for new spices with the right fresh “punch” which you undoubtedly need for this recipe, the manager of the store laughed out loud and told me that “the fresh Christmas spices have not arrived yet” although, at that point I did start to wonder at the logic of all of this because the shelves reaching up all the way to the ceiling in his store are already filled with “Zimtsternen”, “Lebkuchen”, Pfeffernüssen” and other assorted Christmas cookies, go figure. I ended up ordering the fresh spices from a spice merchant.

Last but not least, this dish can be made a day in advance allowing the fruits to soak up more of the spiced poaching liquid, flavor and color.

To see how the other Doristas prepared the poached fruits, please click here.


Wednesday, September 12, 2012

Dark Chocolate Muffins with Crunchy Speculoos Centers and Apple Speculoos Muffins


The last time we went to the Netherlands, I bought a few jars of the regular “Speculoos Spread” as well as a jar of the “Crunchy Speculoos Spread” – which is basically the regular Spread plus little pieces of Speculoos cookies. While I successfully used the Spreads in my cookie baking before, this time, I decided to test both varieties of this delicious Spread for two different muffins recipes. While the Dutch are known for their unbeatable chocolate sprinkles which I always buy, this time I decided to pick up a few boxes of “Speculoos Sprinkles” and “Speculoos Chocolate Sprinkles” which I had never noticed in the stores before but was curious to try. The first muffins I decided to bake were Dark Chocolate Muffins with Crunchy Speculoos Centers and a chocolate topping with Speculoos Chocolate sprinkles…


…and the second recipe I chose, were  Apple-Speculoos Muffins with a crunchy almond cinnamon topping, perfect for this time of year.


Dark Chocolate Muffins with Speculoos Center
(recipe for one dozen)

Ingredients for the Muffin Batter

  • 3/4 cup unsweetened dark cocoa powder, try to find a really good quality one (I use Dutch cacao, such as Van Houten)
  • 3/4 cup AP flour
  • 1/2 tsp baking powder
  • 1/4 tsp fine sea salt
  • 1 1/2 sticks unsalted butter, room temperature
  • 1 cup super fine sugar
  • 3 eggs (L), organic or free range
  • 1 ½  tsp pure vanilla extract 
  • 1/2 cup sour cream, room temperature
  • 12 heaping tsp Crunchy Speculoos Spread (you can also use regular Speculoos Spread)


Ingredients for the Topping

  • about 3.5 ounces dark chocolate, melted, you could add about one tbsp shortening when melting the chocolate
  • some Speculoos Chocolate sprinkles (you can substitute regular chocolate sprinkles)


Equipment

one regular muffin pan
12 good quality greaseproof muffin liners


Preparation of the Muffins and the Topping

1. Preheat your oven to 350 degrees Fahrenheit.
2. Line a 12-cup standard muffin tin with paper liners. The liners should be sturdy so that filling them with batter and the sometimes somewhat “unruly” Speculoos Spread will be easy, not frustrating. You can also “loosen” the Spread with a spoon before using in baking.
3. In a medium bowl, sift together the cocoa, flour, baking powder, and salt and set aside.
4. With your electric mixer cream butter and sugar until light and fluffy.
5. Add the eggs, one at a time, beating well after each addition, then beat in vanilla extract.
6. With mixer on low speed, add flour mixture in two batches, alternating with sour cream - beginning and ending with flour.
7. Using a small ice cream scoop or spoon, fill the muffin liners about one third with the chocolate batter, then add one heaping teaspoon of Crunchy Speculoos Spread per muffin, then some more chocolate batter (just to cover the Speculoos Spread) – the muffin liners should not be completely full (about ¾) as the batter will rise during baking.
8. Bake for about 20 to 25 minutes, the tops should spring back when touched.
9. Cool in the muffin pan on a rack for about 5 minutes, then carefully transfer to a wire rack to cool completely.
10. If decorating: place the chopped chocolate or chocolate chips and shortening in a medium heat-proof bowl. In a separate large heat-proof bowl, put very hot water. Carefully place the bowl with the chocolate into the bowl with the water - the water should come halfway up the side of the chocolate bowl.
11. Stir the chocolate and shortening with a rubber scraper until both are melted and the resulting mixture is smooth. Remove the chocolate bowl from inside the water bowl.
12. Taking one muffin at a time, dip into chocolate mixture, gently tap on the counter to “level” the chocolate and just before the chocolate sets, decorate the tops of the muffins with sprinkles.


Recipe for Apple-Speculoos Muffins
(recipe for one dozen muffins)

Ingredients for the Muffins

  • 90 grams (1/3 cup plus 1 tbsp) unsalted butter, softened
  • 70 grams (1/4 cup plus 1 tbsp) regular Speculoos Spread
  • 90 grams (1/2 cup minus 1 tbsp)  super fine sugar
  • 2 eggs (L), organic or free range 
  • 1 1/ 2 tsp pure vanilla extract
  • 110 grams (1 cup minus 1 tbsp) AP flour
  • 1 ½ tsp baking powder
  • one pinch of fine sea salt
  • 30 ml  (1/8 cup) half and half
  • 2 apples, diced (I used two medium sized baking apples )


Ingredients for the Topping (optional)

  • chopped almonds, skin on (about 20 almonds)
  • 2 tbsp coarse white sugar, you can also use Demerara Sugar (UK) or Turbinado Sugar (US)
  • ¼ tsp cinnamon, preferably from Ceylon


Equipment

one regular muffin pan
12 good quality greaseproof muffin liner


Preparation of the Muffins and the Topping

1. Preheat the oven to 160 degrees Celsius (320 degrees Fahrenheit).
2.  In a bowl of your electric mixer, cream the butter, Speculoos Spread, and sugar, until light.
3.  Add the eggs, one at a time, beating well after each addition, then beat in vanilla extract.
4. In a medium bowl, sift together the flour, baking powder, and salt.
5 With mixer on low speed, add flour mixture in two batches, alternating with the half and half - beginning and ending with flour.
6. Turn off the mixer and switch to a rubber spatula. Gently fold in the diced apples.
7. In a small bowl mix together the chopped almonds, sugar and cinnamon.
8. Fill muffin moulds with the batter (2/3 full) sprinkle with some chopped nuts and bake for 20 to 25 minutes.
9. Cool in the muffin pan on a rack for about 5 minutes, then carefully transfer to a wire rack to cool completely.


Both recipes were really wonderful. Speculoos Spread, whether you use the regular or the crunchy variety,  is not only fantastic for baking in cookies but wonderful for incorporating into your muffin recipes. The Dark Chocolate Muffins had a soft Speculoos center and the chocolate topping plus the sprinkles added a nice touch, both visually and flavor wise. And some of my taste testers could not get enough of the Apple-Speculoos Muffins, they tase like autumn, have a crunchy top and smell heavenly when baking - the cinnamon, apple, almond and speculoos flavors are just wonderful!


SOURCES:

Muffin pan from “Patisse” (www.patisse.nl)
Muffin liners from “House of Marie” (www.houseofmarie.nl)
Speculoos Spreads (Original Speculoos and Speculoos Crunchy) and Sprinkles (Speculoos Hagel) from “Lotus” (www.lotusbakeries.com)