Friday, July 15, 2016
The Joy of visiting a Ceramics Market & using Pottery for the Presentation of your Everyday Food
The popular belief that dictates the use of matching plates, when presenting food should, in my humble opinion, be considered somewhat outdated. When you look at the food photography in the social media or browse through the photographs in cookery books or the food pages in magazines, it is rather obvious that the chef and the publisher have gone to great lengths when choosing the dishes on which the food is to be presented. When the photograph shows a selection of dishes to accompany the recipes, it is rare to see them displayed on matching pieces, but the colors and materials of the dishes always harmonize
When putting food together for either an fun family-style lunch, a formal dinner menu or for a buffet, while the foods selected will complement each other, they will each require a different style of dish from which to be served. That is where the fun comes in. Choosing vessels that best present the individual portions of a meal can also mean using very different pots and plates, bowls and boards, made of different materials like clay, wood, pewter or porcelain.
We all need to eat so why not enjoy it to the fullest. Eating from a paper plate at the seaside or the state fair is a pleasure we take from childhood into adulthood and there is nothing wrong with that. On the contrary. However,when it comes to sharing our table with family and friends, a lot more effort goes into it. So why do so many of us not give the same attention to the presentation.
Probably because finding beautiful pots and plates to serve and eat from are not always readily available, so we end up using the same ones over and over again. But our choice of dishes and the way we cook them are as personal and individual as we are. So why not take it that one step further and put our own stamp on our table and presentation.
I am continuously on the look-out for pretty and unique plates and serving dishes. Sometimes I visit fleemarkets, garage sales and goodwill stores, at other times I visit as many arts and craft shows and pottery markets as I possibly can. These days my attention is focused on natural looking plates with a special touch, those that complement the food that is presented in and on them. While I will most definitely try to go for a few matching plates, I do not mind if they are all unique.
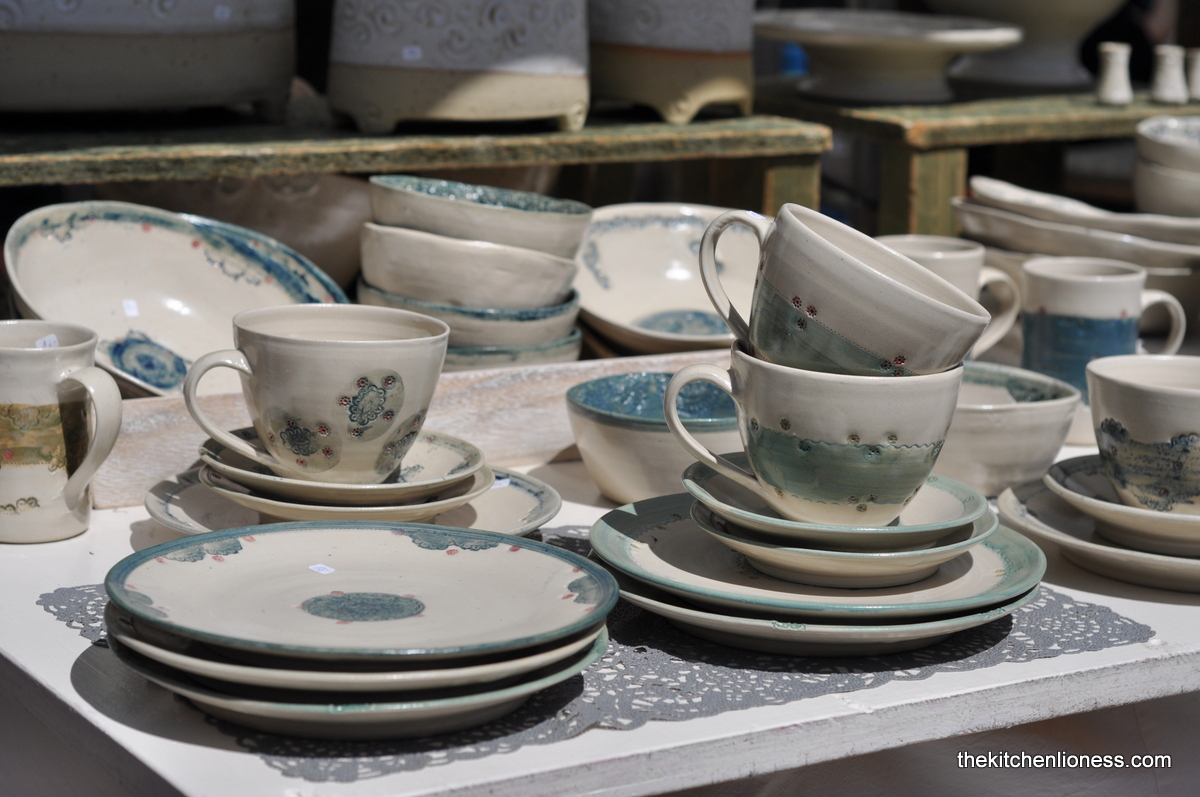
The other day, when visiting a Craft Fair, I came across a beautiful bowl by German pottery artist Alina Penniger and I fell in love with one of her many designs. Her bowls and plates that I like the most look like they were „stamped“ with a lace design. Very unique. And a beuatiful way to present just about any food.
So I asked her to craft some plates specially for me. Luckily, she immediately agreed to do so and and brought them to the next pottery market she attended. I am now the happy and rather grateful owner of a small, albeit growing, collection of her work. I brought my loot home safely and on the same day I happily displayed four of her plates and bowls - plus a tiny vase – on our table in the garden – just for us to enjoy. While these plates and bowl have a matching design, they are all still different an dunique and will harmonize with many other dishes that I own.
Following are a few impression of the beautiful wares that were on display and for sale at the Pottery Market in the pretty town of Siegburg (Germany). Here are spome more of the amazing pottery that was crafted by Alina Penninger.
I might chose these plates next time and go for this design of hers. The colors used and the design will match my food creations perfectly, I am sure.
Cherrries look even prettier when displayed this way. I enjoyed the way the artists arranged their wares in different ways - colorful flowers complemented their unique pottery in the most delightful of ways.
These jugs from a different artist were so pretty - the different shades of turquoise and greens were real eye-catchers, to say the least. I liked the shiny glaze and the look that is reminiscent of Greek designs.
One potter displayed bright orange and yellow nasturtium in a specially crafted vase that looked like a natural rock.
Beautiful colors – I could imagine that the morning cereal or café au lait tastes even better when served out of these amazing creations.
More of these wonderful jugs and vases and plates and tea pots. And more lovely flowers on display to complement the pottery.
Budding artists - like our youngest crafting her own little bowl - this picture is for my friend Mary - the Aspen cap she send came in very handy again on this sunny day in July...
Loved these tiny bricks.
Beautiful dark and bright colors make for very pretty glazes for these bowls.
Very unique pieces on display at this stall.
More tiny bricks to play with - these are perfect for children as they inspire youngsters to get creative. These came in different colors and the ones in the picture had soaked up all that warmth from the sun that day - the kids adored them.
Unique contemporary ceramic art.
Pottery cames in many shapes and sizes - it can be as unique as the artist her- or himself. It can be a piece of art to be displayed in a showcase but it can also be used in everyday life, to complement the food we so lovingly prepare for our families and friends. You can buy a whole set that matches or you can chose one or more unique pieces to complement your other dishes.
Should you get the chance, make sure to visit a local pottery market or ceramics fair. It is fun to take a look at a diverse range of original ceramics for sale from lamps, tableware, and vases to sculptures and unique pieces. And then, if possible, support the wonderful artists that create those amazing everyday wares and unique pieces of art.
For more information on ceramic artist Alina Penninger and her handmade stone dinner ware and garden ceramics, you can go here.
Monday, July 11, 2016
Summertime Cookie Heaven & A Recipe for Tahini and Halva Cookies with White Chocolate
Summer holidays are here to stay for the next six weeks. That means a lot of fun activities, visits to markets and fair grounds, excursions and day trips to nearby Belgium and the Netherland. It means family movies and visits to the museum, swimming pools and suntan lotion, garden parties and BBQ´s, good books and great stories, and arts and crafts. It also means baking, despite the warm and summery temperatures in my tiny kitchen. I just cannot NOT bake. There is always something wonderful about baking. Combining different tastes and textures, putting the doughs and batters in the oven, and waiting for that moment when the scent of cookies, quiches and cakes whafts through the house and draws you into the kitchen.
These days, fresh cookies are a real must. I love to bake cookies and have done so extensively in the last couple of months. Some of the recipe have been blogged about, like the buttery French Sablés Breton (you can consult the recipe here), some have not, at least not yet.
I am also a strong believer of pairing fruits and sweets and I just know that soft and fudgy cookies are delicious paired with a handful of summer fruit. Come summertime, I will serve my Deep Dark Chocolate Cookies with tangy, juicy red currants or sweet cherries. And I adore serving my Biscoff Oatmeal Cookies (picture below) with sweet flat peaches, apricots and nectarines.
But these days I also love to experiment with different flours. I will bake my Peanut Butter and Dark Chocolate Cookies only with spelt flour, and I love to bake these Tahini and Halva Cookies with rice flour. Different flours and different and unusual ingredients is what grabs my attention these days.
The recipe that I am featuring today features not only rice flour but also Tahini as well as Halva. As most of you know, Tahini is one of the most popular spreads in Israel. People will eat it with just about everything, inside their pitta bread, as a simple sauce for vegetable salad, the love for this spread is intense. And Halva (pictured below), is a sesame confection made from Tahini sweetened with a simple syrup made with sugar or honey and fragrant orange blossom or rose water, sometimes both. It can be “plain” in flavor, strewn with pistachios or even swirled with chocolate. The mixture is molded and pressed into containers or molded into different shapes. It is a wonderful confection on its own and I love to bake with it. I have baked Ottolenghi´s Halve and Walnut Cake (you can look here) and I most certainly love to bake these Tahini and Halva Cookies with White Chocolate.
Tahini Halva Cookies with White Chocolate
(recipe inspired by my favorite hippest London baker Claire Ptak - for another recipe from Claire, please consult my blog here)
Ingredients
- 100g tahini paste*
- 125g unsalted butter, softened
- 125g golden caster sugar (I like to use Tate&Lyle „Light Soft Brown Sugar“)
- ½ tsp fine sea salt
- 1 tbsp pure vanilla (I like to use 2 tsps homemade vanilla sugar)
- 1 egg (M), free-range or organic
- 250g rice flour (easily available at your favorite health food store, I like to use the one from Müllers Mühle)
- ¾ tsp baking powder
- ¼ tsp baking soda
- ½ tsp ground Ceylon cinnamon or opt for cardamom instead
- 200g plain halva, broken into pieces**
- 150g white chocolate, broken into pieces (use the very best quality you can afford, I like to use the one from Coppeneur)
- 2 tbsp sesame seeds, for topping (I like to use organic sesame seeds from my favorite health food store)
Preparation
- Preheat the oven to 180°C (350°F).
- Line two baking sheets with baking parchment or silpat non-stick baking mats
- In a large mixing bowl, cream together the tahini, butter and sugar until fluffy.***
- Add the salt and vanilla, then beat in the egg.
- Add the rice flour, baking powder, baking soda and cinnamon.
- Add the halva and white chocolate pieces, and carefully mix these through the dough.
- Scoop portions on to your prepared baking sheets and sprinkle with sesame seeds.
- Bake in the oven for 15to 18 minutes or until light golden brown.
- Let rest a few minutes on the baking sheets until cool.
- Serve straight away (which is what I do) or store in a cool place in airtight container/cookie tin between layers of parchment paper for up to three days.
*NOTE: for tahini check out markets in your community that specialize in Middle Eastern foods or try a natural foods store – to find a brand that you like.
**NOTE: for those of you unfamiliar with halva, as this is a Middle Eastern confection typically made from tahini paste, nut butters and sugar, you may have to go to a specific shop to find it but generally, it is available at larger grocery stores and at Middle Eastern markets. While there are many different varieties of halva available, such as the chocolate-marbled one, you should try to use plain or vanilla Arab-style sesame halva for this recipe. Arab-style halva is said to be the best tasting.
***NOTE: if you don’t have a mixer with the paddle attachment, you can make the dough by hand, with the help of a pastry blender.
The sweet vanilla scented white chocolate pairs extremly well with the salty, melt-in-the-mouth Halva and sesame Tahini paste. As I said before, feel free to experiment with these lovely and a bit unusual ingredients and make sure to stock up on one or more tubs and jars if you enjoy their distinct nutty, sesame-infused taste.
As much as I adore the combination of salty-sweet in my chocolate, I love it even more in cookies such as these Tahini and Halva Cookies with White Chocolate. Summertime Cookie Heaven.
Wednesday, July 6, 2016
Cherry, Prosciutto & Goat Cheese Bruschetta
When I was growing up we lived in a big old house with fourty-three fruit-bearing trees in our garden – the reason why I remember that number of trees is rather simple. My parents told just about everyone we knew or met at the time that our garden was studded with all those apple, pear and cheery trees. And I must admit to having loved that garden. My sisters and I built a tree house in one of the many apple trees and our afternoons were filled with times spent in the garden. Those were the days…
One tree I remember in particular was a sour cherry tree that bore a ton of fruit each and every year. Its sturdy branches were hanging over one of the upstairs balconies and reached almost all the way into the house. We loved being able to pick the cherries of the tree while sitting on the terrace and we loved those small, tangy, juicy sour cherries.
These days I still adore sour cherries but we do not have a cherry tree anymore and it turns out that they become harder to find in the markets and at the green grocers with each passing year. People prefer those big, burgundy sweet cherries. I still love both varieties and try to make as many dishes and recipes with them as I possibly can. The Dark and White Chocolate Cherry Brownies I blogged about last month, are still a huge hit at our house (for the recipe, please go here) - but cherries also add a "wow" factor to many savory dishes, such as my Cherry, Prosciutto & Goat Cheese Bruschetta.
Ripe sweet cherries, together with mild creamy goat cheese, delightfully salty prosciutto, a very lightly nutty pistachio oil, and just a bit of high-quality sea salt are absolutely and utterly addictive when enjoyed together in one dish. The flavors of these few components combine beautifully on these toasted slices of Italian Ciabatta – just the perfect little and very tasty nibble for a summer party. While cherry season lasts (we seem to have only another three to four weeks to go around here) you could also serve these for breakfast, brunch, and dessert all summer long or until the end of cheery season.
When shopping for cherries remember that there are many different types of cherries, including maraschino, griotte and Morello cherries, from which Kirsch and Black Forest Gâteaux (Schwarzwälder-Kirschtorte) are made. The best cherries are plump, firm, glossy and free of blemishes and their stems should be fresh and green. Cherries benefit most from being stored at cooler temperatures - warmth can compromise their flavor and texture.
Cherry, Prosciutto & Goat Cheese Bruschetta
Ingredients
- 1 loaf of Italian or Italian-style Ciabatta
- 100g creamy goat cheese (it is nice if you can get your hands on a local goat cheese here - whichever one you use, make sure to choose a mild, soft goat cheese suitable for spreading and for use in desserts)
- about 12 fresh, plump, ripe and blemish free sweet cherries for the bruschetta PLUS a few more for serving alongside
- 80g Italian prosciutto
- mild pistachio oil OR go for extra virgin olive oil
- sea salt (optional) such as the British Maldon sea salt OR the French Le Fleur de Sel de Guérande
Preparation
- Heat the grill to its highest setting.
- Cut the ciabatta into 12 slices.
- Grill the sliced bread – make sure the slices do not get too dark and turn once.
- Remove the grilled bread from under the grill and place on a pretty platter.
- Using a butter knive or a small offset spatula, spread over the creamy goat cheese.
- Pit and halve the cherries and arrange them on top of the bruschetta with the prosciutto.
- Drizzle over some pistachio oil to serve and sprinkle with a bit of the best sea salt that you can afford (that is optional and depends on the saltiness of your prosciutto and goat cheese).
Goat cheese should always be white on the inside, with none of the yellowness that is common to cows’ milk cheese. If you’re worried about the pungent flavor that some goat cheeses can have, ask your cheese monger to let you taste it before you buy it and make sure to look for young, soft, creamy cheeses. Due to the number of varieties, goat cheese is available year-round, but some are best in the summer.
With this delightful recipe, there is absolutely no reason to wait until dessert to serve this juicy summertime fruit - take cherries on a fun and savory spin as a bruschetta topping for a kind of appetizer that will impress all those lovely people that enjoy the mix of sweet and salty, fruit and cheese and best of all, love, love to eat seasonally.
Sunday, June 26, 2016
Familiar Favorites and novel Interpretations & A Cauliflower, Pomegranate and Pistachio Salad
To me the Now feels like a really good time to start out with a new outlook on things. To get in the kitchen or boost your outdoor grilling season with fresh, healthy ingredients that although they have a strong character and are delicious when they stand alone, are even more delightful when placed together in an extraordinary summer dish. A meal that is without equal.
We can all keep cooking this summer relying on those well-known, much-beloved, tried and true recipes or we can turn our minds and hearts to new challenges ahead of us. As much as I love those family favorites that are guaranteed to please them all (at least at our house and around our table) – I love to see the look on everyone´s faces when they discover new tastes and different, interesting flavor combinations, perhaps some they have never tasted before.
Trying out new ideas is exciting to all of us and discovering new ingredients is always great fun. But discovering new and different ways to cook with ingredients that are already familiar to us, is, however, possibly even more fun. Take this salad recipe, for instance. You will find yourself happily grating raw cauliflower into crumbs and discover that the little white bits are crunchy and fresh and work well in all manner of raw salads, salsas and other dishes. You might then consider mixing grated cauliflower with other chopped raw vegetables such as carrots or even beetroots or dress them with a tangy vinaigrette and dot with some local goat's cheese. Or, as is done in this recipe, mix-up the freshly grated cauliflower with oven-roasted, caramelized cauliflower florets, for an entirely new taste experience.
I have always loved roast cauliflower, and I have cooked many a dish using cauliflower. There was Stir-fried Sesame Cauliflower (you can take a look here) or Cheat´s Cauliflower Cheese (here) to name but a few but I have not really been known to rave about how tasty it is grated raw, so imagine how delighted I was to discover that the combination of the oven-roasted with the freshly grated cauliflower works spectacularly well.
What better place to look for a recipe today than amongst those creations from the endlessly talented, much-admired and tireless Yotam Ottlenghi who is working and creating and cooking in London, England…
When researching, the first recipe that caught my attention before I prepared Yotam Ottolenghi´s Cauliflower, Pomegranate and Pistachio Salad, was his delightful recipe for Roasted whole Cauliflower with Crème Fraîche. Now that is a looker. Once you have removed the beautifully roasted whole cauliflower from the oven, you then serve it with a lemony crème fraîche and a little extra sea salt (my favorite being Maldon sea salt here with its distinct crystals) for sprinkling on top or alongside.
Cauliflower, Pomegranate and Pistachio Salad
(recipe inspired by Yotam Ottolenghi)
Ingredients
- 60ml sunflower oil
- 1 white onion, (M), peeled and sliced thin
- 1 cauliflower, (L) leaves removed and base trimmed
- 60ml mild olive oil
- sea salt
- 25g Italian parsley leaves, chopped
- 10g mint leaves, roughly chopped
- 7g tarragon leaves, finely chopped
- seeds from ½ medium pomegranate (about 80g net weight)
- 35g unsalted pistachios, toasted and lightly crushed
- ¾ tsp ground cumin
- 1 tbsp freshly squeezed lemon juice
Preparation
- Heat the oven to 190°C (375°F).
- Put the sunflower oil in a small sauté pan over a medium-high heat. Add the onion and cook for eight to 10 minutes, until golden-brown and starting to crisp. Remove from the heat and set aside to cool.
- Coarsely grate a third of the cauliflower (about 160g-worth) and set aside in a large bowl. NOTE: to do this hold the cauliflower by its base and roughly grate the florets on the largest holes of a cheese grater, you should end up with 160g of cauliflower resembling cooked bulgur wheat. The stalks can be discarded or used in crudités.
- Break the remaining cauliflower into medium-sized florets about 3cm wide at the top. Toss the florets in half the olive oil and a quarter-teaspoon of salt, then spread out on a baking sheet.
- Roast for 20 minutes, until cooked through and a dark golden-brown. Remove and set aside to cool.
- Add the onions and their oil to the grated cauliflower, then stir in the remaining olive oil and a quarter-teaspoon of salt.
- Add the remaining ingredients apart from the roast florets, mix well, then gently fold in the florets and serve at once.
And, yes, Germans are known to love, love their cauliflower dishes. But times are changing. And to me it is not enough to rely only on known recipes such as the rather bland Boiled Cauliflower with Butter and Table Salt that I ate when I was a child. Do not get me wrong. This was a dish that was alright at the time but that is not satisfactory anymore. And we all know that. We all know that we can do so much more when we take a fresh and unbiased look at everything and everyone around us. So, be bold. Get out there and get those familiar ingredients but give them a fresh, colorful and healthy make-over that might surprise you, your family, friends and guests in more ways than you ever imagined.
And, yes, the pomegranate´s colorful and bold red seeds add juicy bursts of natural sweetness to this salad, and yes, the bright green, somewhat wonderfully sweet pistachios bring crunch to it and yes, the many different herbs add a delicious fresh flavor here…but more importantly, the flavors come together amazingly well in this delightful, unique and healthy summer dish.
Try it, you might like it.
To me, the Now is begging for new perspectives…
Sunday, June 12, 2016
Victoria Sponge with Mixed Berries for the Queen´s 90th Birthday Celebrations
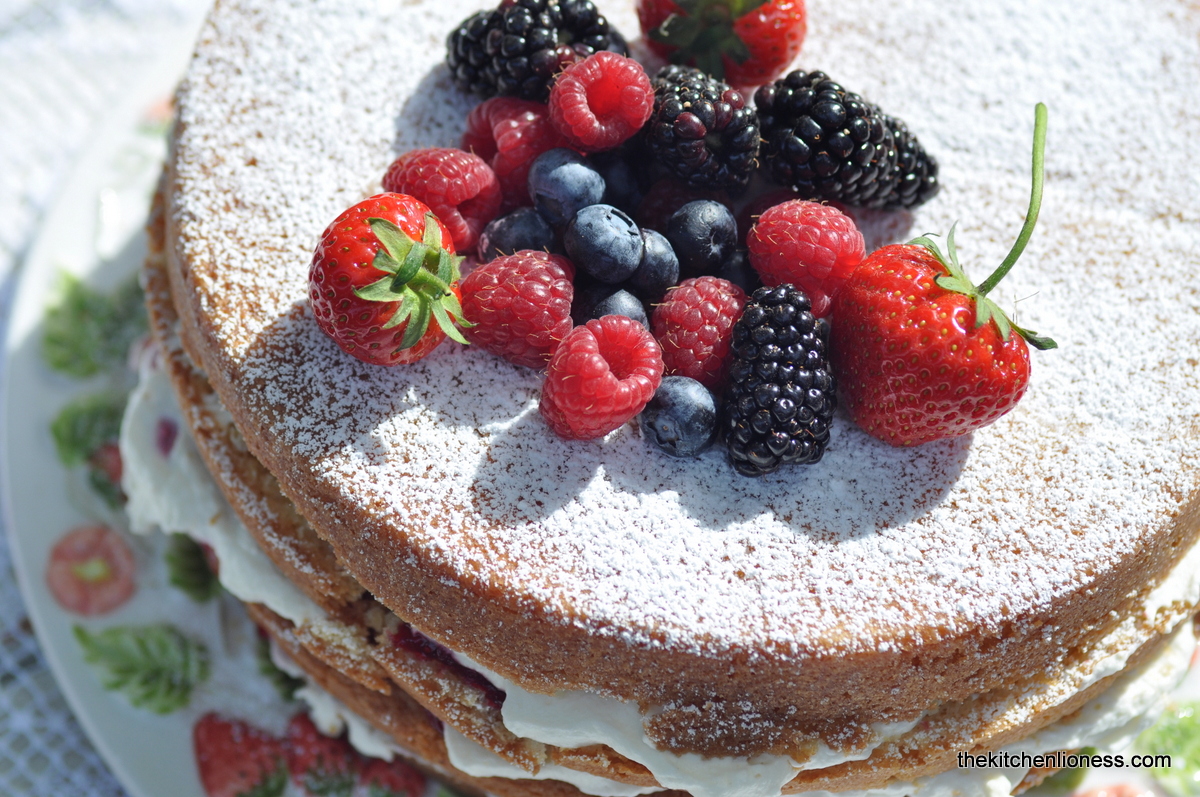
If you are planning to celebrate the Queen´s 90th Birthday in style this weekend, may I suggest doing so with this classic Victoria Sponge which is always a teatime winner, as every bite brings a taste of nostalgia. Based on a rather traduitional recipe, I chose to make a four-layer version instead of two layers and chose to add a bit of vanilla-whipped cream between each layer for that extra bit of indulgence. And I made a quick raspberry jam with loads of fresh raspberries from the market to add between the layers of spongey, buttery goodness.
Victoria Sponge with Mixed Berries
Ingredients for the Sponge
- 225g unsalted butter, room temperature, plus extra for greasing
- 225g self-raising flour (get it online or from your favorite English store, like this one here)
- 1 tsp baking powder
- 225g superfine (caster) sugar
- a good pinch of fine sea salt
- 4 eggs (M), free range or organic NOTE: it is a good idea to weigh the eggs in their shells, their weight should equal the weight of the flour, butter and sugar, hence about 225 grams
- 2 tbsp milk (I like to use 3.5%)
Ingredients for the Filling
For the Raspberry Jam
- 500g raspberries
- 500g jam sugar
- ½ lemon, juice only
For the Vanilla Whipped Cream
- 500ml double cream
- 4 tbsp icing sugar
- scraped seeds from 1/2 vanilla bean (keep the remainder for that homemade vanilla sugar)
- strawberries, blueberries, raspberries fresh, to decorate OR use whatever seasonal fruits are suitable for this type of cake
- icing sugar, for dusting
Preparation
- Heat oven to 180°C (356° F).
- Grease and base-line 2 x 20cm (0.78 x 7.8in) non-stick round cake pans with baking parchment, then lightly grease the parchment.
- Sift the flour and baking powder into a large bowl, then add in the remaining sponge ingredients.
- Using an electric whisk, beat everything together until smooth.
- Divide the mix between the cake pans, then bake for 20 to 25 mins until cooked and golden.
- When cool enough to handle, remove the cakes from the pans, then leave to cool completely on racks.
- Meanwhile, make the jam: place the raspberries, the jam sugar and lemon juice into a large heavy-bottomed pan and stir over a moderate heat for 2 to3 minutes, or until the sugar has dissolved.
- Turn up the heat and boil for 5 minutes – this is an ‘instant jam’ so you don’t have to check for setting point.
- Remove from the heat, pour into a tray and set aside to cool.
- To make the vanilla-whipped cream filling: whip the cream with the icing sugar and the scraped vanilla seeds until it holds its shape.
- Build the cake by spreading one sponge with jam and the other with cream OR do as I did and cut the two cakes into two layers eachg to create four layers total.
- Sandwich the cake layers together, then dust with icing sugar.
- Decorate with fresh berries and elderflower blossoms (if you happen to have some on hand).
NOTE: Ovens will vary, so to ensure that your cake is cooked all the way through, test your sponge before removing it from the oven. A cooked sponge will have shrunk away from the sides of the pan and the center will feel springy. Once this has happened, do the skewer test. Insert a skewer in the centre of the sponge – if the cake is cooked, it will come out clean. If there is any cake mix on the skewer, give the cake a few minutes more, then test again.
You can't go wrong with this perfect party cake - full of spongey goodness. Makes a super-simple wedding cake, too. Or plan a get together with your favorite people this summer, host a tea party and serve this lovely cake that combines a soft golden victoria sponge, homemade raspberry jam, softly whipped-vanilla cream, and loads of fresh berries - best served with a proper cup of tea, my favorite being the utterly delightful Earl Grey's Lady Violet (to be found here.).
During my research, I learned that as a child, Queen Victoria wasn't allowed to indulge in sweet things too often. It is said that on the throne, she certainly made up for lost time. Every week each of Victoria's royal residencies received a rather generous consignment of pastries from the Buckingham Palace kitchens. It is fair to say that the queen adored cake and it is fitting, then, that she should have given her name to the most delicious of all British teatime cakes, the Victoria Sponge.
Opinion differs as to the components of a true Victoria sandwich. To add or not to add vanilla. To dust or not to dust with icing sugar. Should the filling include whipped cream or only jam. Queen Victoria's would have been sandwiched with jam alone, the layer of whipped cream was a 20th-century addition. Personally, I don't think there is a need to be too purist. And I do fill my Victoria Sponges with different types of jams, depending on the season, not just raspberry or strawberry but also rhubarb or apricot.
A Victoria Sponge is supposed to be 'butter-rich', this is what sets it apart from the whisked fat-free sponges and Genoise cakes invented in the 18th century that lack the sturdy keeping qualities of a Victoria Sponge. The sponge part evolved from the classic pound cake – equal quantities of butter, sugar, eggs and flour. The difference was the Victorian creation of baking powder, which enabled the sponge to rise higher. No matter whether you are a true purist or chose more modern approach to sponges, this cake will always be a cake fit for a queen!
Tuesday, June 7, 2016
Life is Just a Bowl of Cherries with these Dark and White Chocolate Cherry Brownies
It is this time of year again, cherries are widely available. And although we have a cherry tree in our garden, they are not quite ripe yet. But on the weekend we not only visited a wonderful "wool market" and watched weavers, sheepshearer, broom makers, pottery makers, and farmers show off their traditional trades but we also bought a lot of fresh regional produce, including sweet, dark cherries. So I decided to make the most of my loot and bake one of my favorite recipes. You can't beat classic and indulgent Dark and white chocolate cherry brownies. Before getting strated baking, sort your cherries and make sure to look for those that are plump, firm, glossy and free of blemishes and their stems should be fresh and green. Cherries benefit most from being stored at cooler temperatures as warmth can compromise not only their flavor but also their texture, so keep them in the fridge in the crisper.
These brownies contain white as well as dark chocolate. White chocolate is technically not real chocolate as it doesn't contain any cocoa solids, but it is made primarily of cocoa butter, sugar and milk solids. White chocolate must contain at least 14% milk solids and high quality brands of white chocolate are made with a high proportion of cocoa butter and real vanilla. White chocolate retains a popularity all of its own as a vanilla-scented indulgence or as a decorative contrast to dark chocolates.
Dark chocolate should contain a minimum of 35% cocoa solids, at least 18% of which should be cocoa butter. However, the cocoa content can be, and often is, much higher than this, and can reach up to 80% and even 90%. High-quality dark chocolate has a more bitter taste than chocolate confectionery. It can be eaten as a snack or incorporated into rich cakes, sauces or desserts like these incredible brownies.
Dark and white chocolate cherry brownies
(recipe inspired by James Martin: Home Comforts)
Ingredients
- 350g/12oz high quality dark chocolate (minimum 55% cocoa solids - use the best dark chocolate you can afford)
- 250g/9oz unsalted butter, plus extra for greasing the brownie pan
- 3 eggs (L), free-range or organic
- 250g/9oz dark soft brown sugar
- 110g/4oz plain (AP) flour
- 1 tsp baking powder
- a pinch of fine sea salt
- 150g/5½oz fresh cherries, cut in half, stones removed
- 150g/5½oz white chocolate, roughly chopped (again, use use the best brand white chocolate you can afford)
- 1-2 tbsp cocoa powder, for dusting (unsweetened, of course)
Preparation
- Preheat your oven to 170° C (340° F).
- Grease a 30x23cm (12x9in) baking pan with butter then line the base and sides with baking paper.
- Heat the dark chocolate and butter in a saucepan over a low heat until just melted and well combined, stirring occasionally. Remove from the heat and set aside to cool slightly (at least 5 minutes).
- Meanwhile, whisk the eggs with the sugar in a large bowl until thick, pale and creamy.
- Whisk the cooled chocolate mixture into the egg mixture, then gently fold in the flour, baking powder, salt and half the cherries until just combined.
- Spoon the brownie mixture into the prepared tin, then scatter over the white chocolate and the remaining cherries.
- Bake the brownies in the oven for 25 to 30 minutes, or until the surface is cracked and a skewer inserted into the centre of the brownies comes out with just a little mixture sticking to it.
- Remove from the oven and set aside to cool completely in the pan, on a wire rack.
- To serve, dust the brownies with cocoa powder, then cut into squares and remove from the pan.
NOTE
If fresh cherries are unavailable, you can use frozen cherries instead. Defrost them first, drain and mix in as directed. They are likely to be wetter than fresh cherries, so you may need to cook your brownies for a few minutes longer. You could also use raspberries instead but it remains a fact that chococlate and cherries go fantastically together.
These decadent brownies must be the ultimate grub on the go. They are chewy but cooked. They are gooey in the center, have a soft texture and a crackly top. Just perfect.
These brownies do get better the longer you leave them - so after a day or two they get even better. Forget cookies for a while, this is a treat that can also travel anywhere. Think office, bake sale, birthday surprise....Packed with loads of rich chocolate and moist fresh sweet cherries, it is always advisable to grab one of these brownies before you share them because they will not last. Trust me on this one.
Wednesday, June 1, 2016
The mistaken Apricots - Oven-Baked Vanilla Nespole
The other day an elderly lady stood in line with me at the greengrocers. There were lots of people in front of us and while we waited I noticed that she kept checking her pre-packaged apricots again and again. After checking the package for the umpteenth time, she turned to me and asked me wether I was sure that these were in fact apricots, I re-assured her that what she had chosen, were in fact apricots. She gave me a big smile and answered "I certainly do not want to buy these strange looking apricots again that I bought last week, they were tangy and they tasted nothing like real apricots". In fact, she must have bought nespole not apricots, I told her. "Ohhhh", she sighed, "that´s why..."
Nespole, in Italian, nefles in French, Mispeln in German, or nisperos in Spanish, are round and a little reminiscent of apricots were it not for their shiny skin. They are delicious eaten raw or can be turned into jam or chutney. This slightly bitter fruit that looks like an apricot and is similar to a loquat is popular in spring in Tuscany. Though they may be a bit difficult for some to track down, nespole make their appearance in spring all over markets or neighbourhood trees in Italy. Apricots, though sweeter, could be a good substitute in this recipe if you can’t get a hold of nespole.
This small plain looking orange fruit’s season starts early in April. Nespole were introduced in Italy at the end of the 18th century and spread quickly across the country. Perhaps, the popular believe in nespole´s magic powers helped its proliferation: almost every household in the Italian countryside had a nespolo tree as it was said to keep evil witches and bad luck away. Not sure about the witches and the bad luck sort of stuff, but it makes for a nice little story to tell to your family and guests.
While their short season lasts, I buy nespole at my local markets, especially the Middle Eastern greengrocers carry these beauties. The darker shade of orange the better. When choosing nespole, do not worry about small bruises. Once they are ripe, just peel the skin and enjoy their refreshing tangy juicy flesh with a hint of citrus.
In a typical Italian manner nothing goes to waste and the stones from the fruit are even used to make Nespolino, a bitter sweet type of liquor. I know exactly which friend of mine will be the happy recipient of a lovely little bottle of Nespolino liquor soon!
Oven-Baked Vanilla Nespole
Ingredients for the Nespole
- 12 ripe nespole
- 1 vanilla pod (get the best quality you can afford)
- 4 tbsp superfine (caster) sugar
- juice of one lemon, organic please
- 100g Amaretto
- 300g Greek yogurt, natural yogurt, homemade vanilla pudding, high quality vanilla ice cream, ricotta or crème fraîche, to serve
Preparation
- Pre-heat your oven to 180°C (350°F)
- Line a roasting dish with baking parchment.
- Cut the nespole in half and take out the stones along with the tough skin that surrounds them. Place the fruits cut-side up in the dish. Put the vanilla seeds and pod on top of the nespole. OR: slit the vanilla pods lenghtways and scrape out the seeds, then mix the seeds with the caster sugar and sprinkle over the fruit.
- Sprinkle with the sugar and lemon juice.
- Lastly, pour over the Amaretto and place the tray in the oven to bake for 15-20 minutes or until the fruit is starting to caramelize on the edges.
- Remove the fruit from the oven and allow to cool slightly.
- To serve, scoop a generous portion of Greek yogurt on to a plate, and spoon the fruit alongside it.
So, next time you think you are buying what looks like apricots but in fact are nespole, go ahead and give them a try. To bake them in the oven brings out their natural sweetness which is not overwhelming, you will still taste a certain tang. And they are utterly amazing with fresh Greek yogurt, natural yogurt, ricotta or even some crème fraîche or homemade vanilla pudding. Or make jelly with them or some lovely jam, capturing that early summer taste for later in the year.
Subscribe to:
Posts (Atom)